Integrate the NI's iOS sdk to your app to accept payments via cards and apple pay
Step 1. Install SDK
The iOS SDK is compatible with apps written for iOS 11 and above. The SDK can be downloaded via either CocoaPods or Carthage.
If you're adding the framework via Carthage follow the below steps, else you can skip to the CocoaPods section.
Carthage
- Create Cartfile in the root directory where the .xcodeproj file resides.
touch Cartfile
- Add the following to the Cartfile created in the previous step
github "network-international/payment-sdk-ios"
- Run the following command in your shell to download and update the dependency. Before running this command close the Xcode app.
carthage update
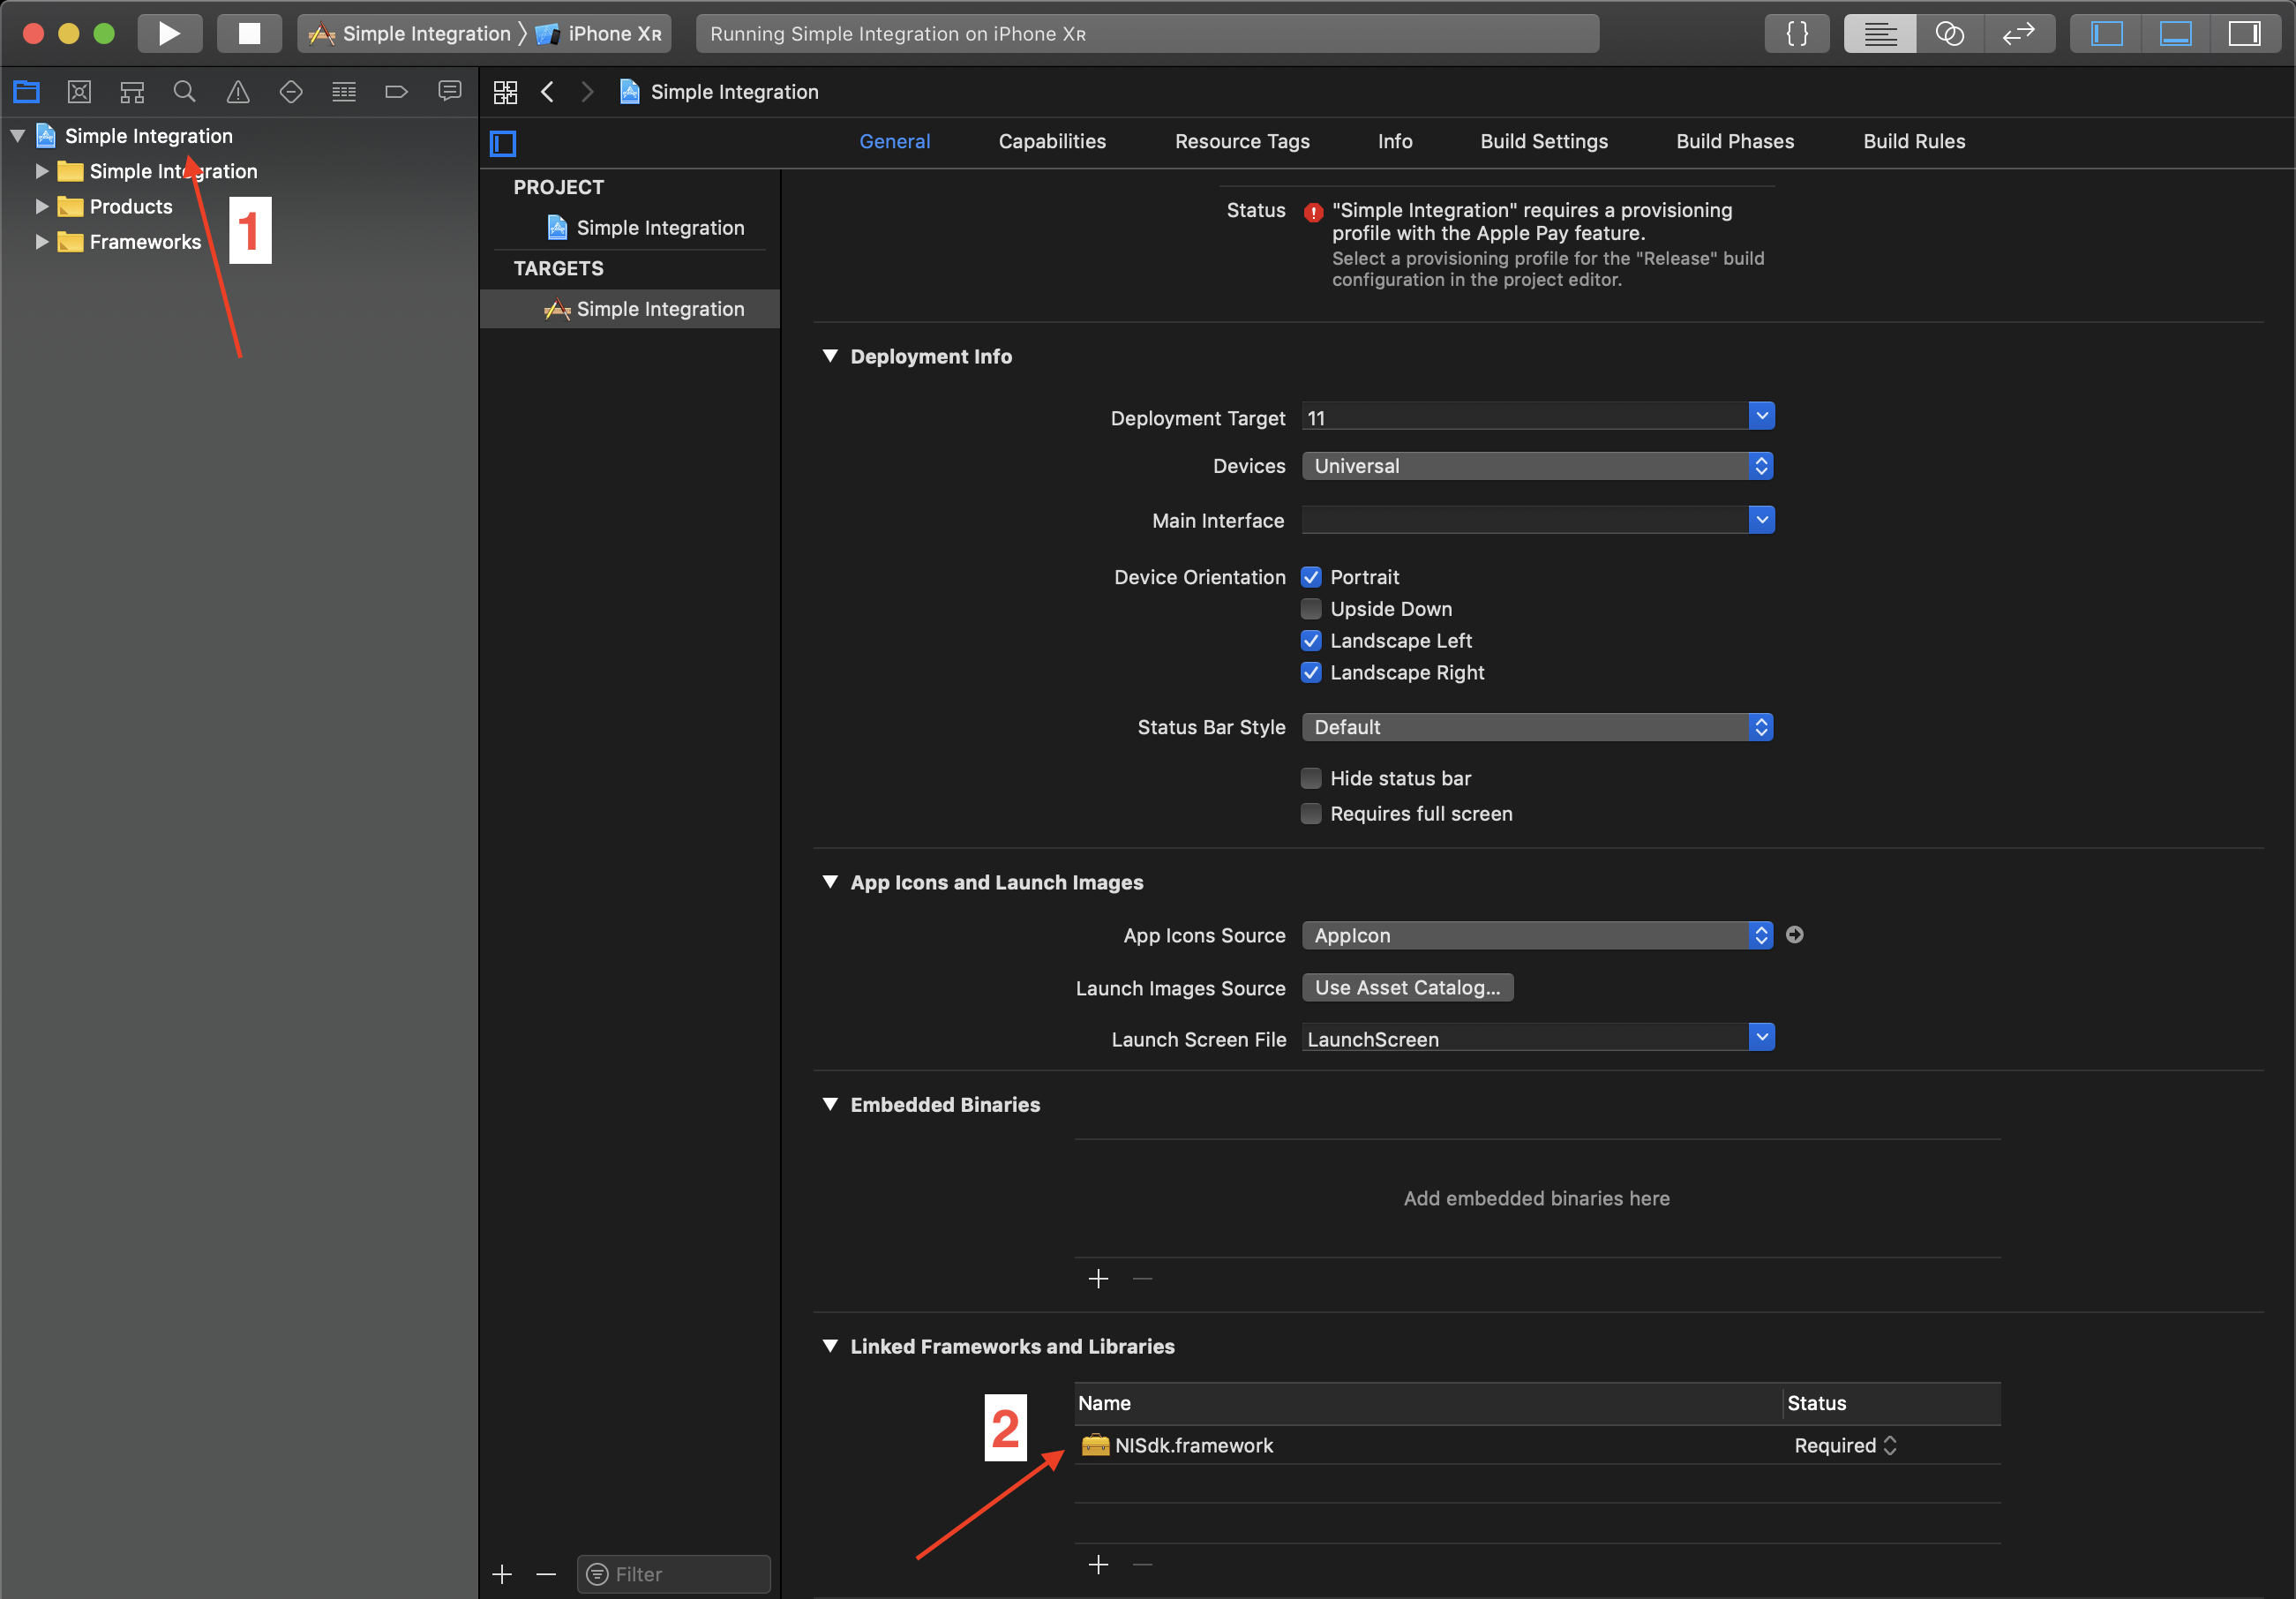
- On your application targets’ General settings tab, in the “Linked Frameworks and Libraries” section, drag and drop NISdk.framework from the Carthage/Build/iOS folder on disk.

Linking NISdk.framework
- On your application targets’ Build Phases settings tab, click the + icon and choose New Run Script Phase. Create a Run Script in which you specify your shell

Add new Run Script Phase
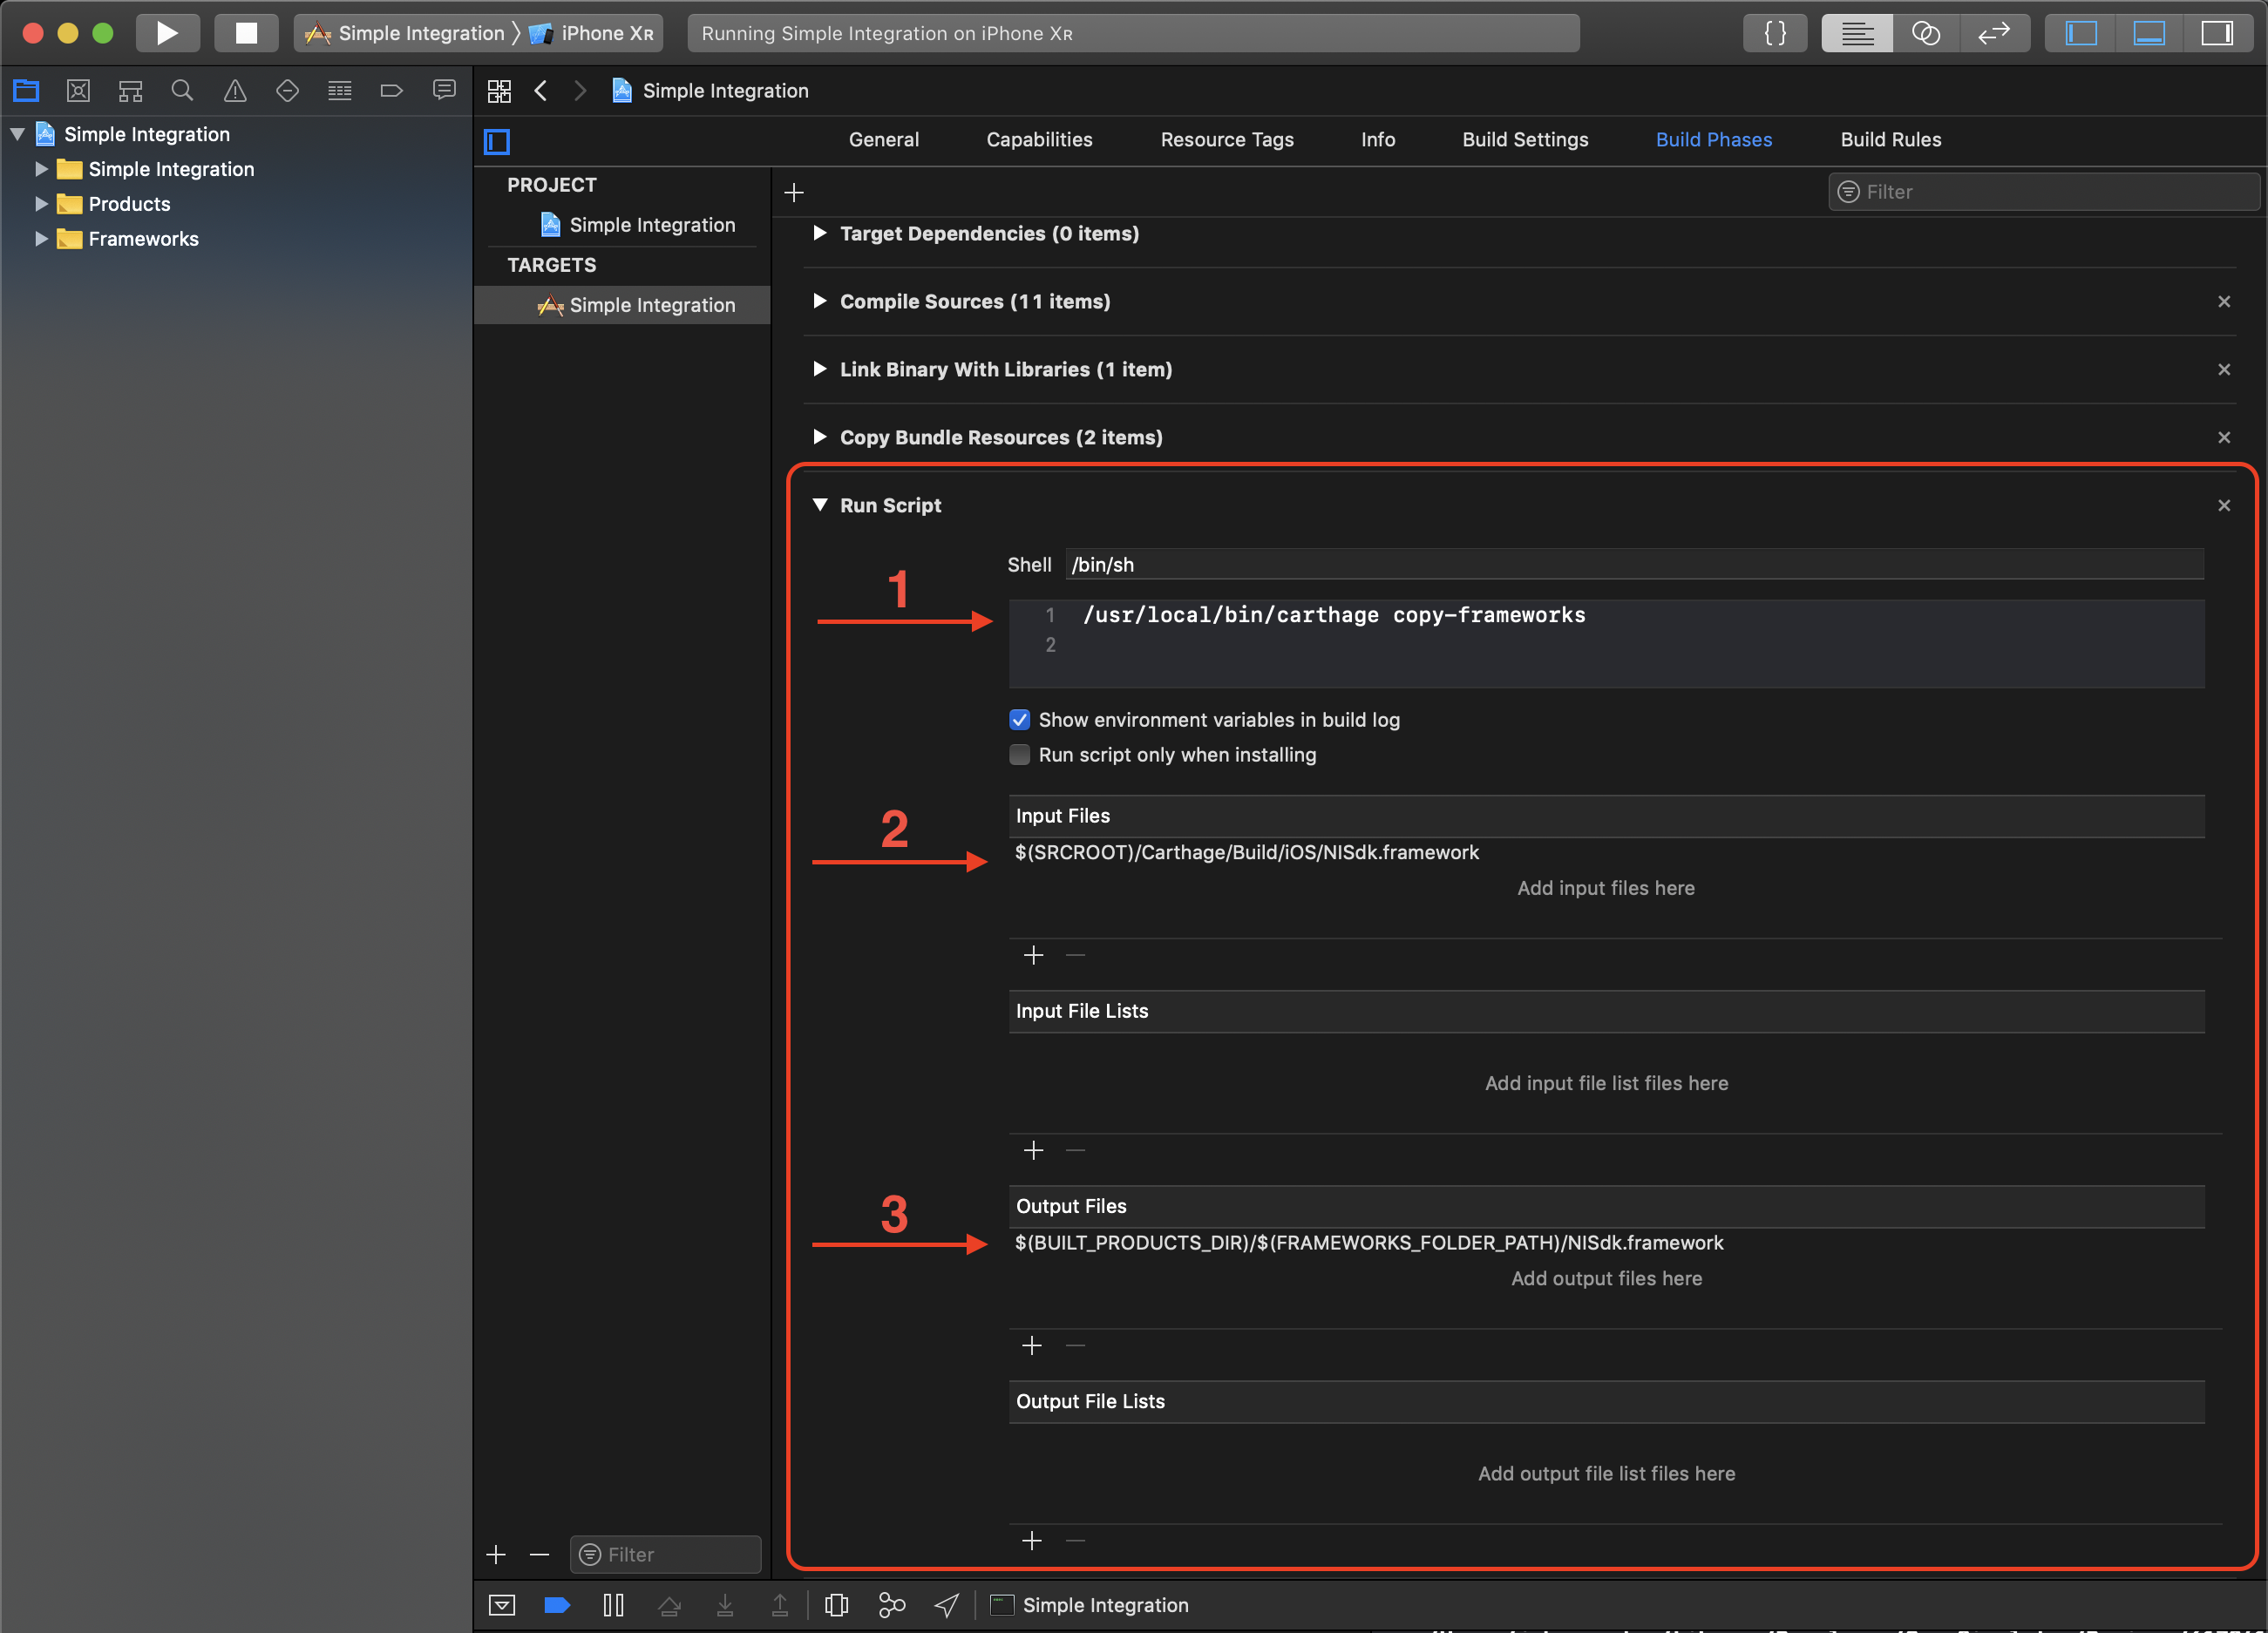
In the added Run script phase add the following content to the script area below the shell
/usr/local/bin/carthage copy-frameworks
Add the following in Input Files under the Run Script Phase added in the above step
$(SRCROOT)/Carthage/Build/iOS/NISdk.framework
Add the following in Output Files under the Run Script Phase added in the above step
$(BUILT_PRODUCTS_DIR)/$(FRAMEWORKS_FOLDER_PATH)/NISdk.framework
After adding all the above the Run Script Phase should look like below

Run Script Phase for Carthage
CocoaPods
-
Create a Podfile in the root directory where the .xcodeproj file resides.
-
Add pod 'NISdk' to the Podfile created in the above step. A sample code snippet is shown below.
target 'Your app target' do
  use_frameworks!

  # Pods for Simple Integration Obj-C
  pod 'NISdk'
end
-
Close Xcode and run pod install command on the directory where the Podfile was created.
-
After performing the above step, open the .xcworkspace file that was created, to open your project.
Step 2. Using the SDK
After you have installed the SDK by following one of the above steps, you can import the SDK into your app and use it.
A typical payment journey will be as follows. It begins with the order creation. To get started first acquire the authentication credentials. For more assistance on this you can contact the on-boarding team.
1. Creating an order
In order to accept payments in-app, an order needs to be created. To create an order refer our order creation api. This needs to be done securely from the merchant's backend. Ideally, the app needs to create the order based on the user's request and send the order request to the merchants's server. The merchant server then uses N-Genius Online's order API to create the order.
A guide to integrate the order api on your server can be found here
For more info on creating an order using the order api, check out our Create an order.
A sample merchant server is available as a reference.
2. Accepting card payments for an order
In order to show the card payment form and collect payment information, import the NISdk into your app's viewcontroller class. A sample code snippet is shown below for swift and objective-C.
// Import the SDK at the top of your viewcontroller file
import NISdk

// Implement  CardPaymentDelegate methods to receive events related to card payment

class YourViewController: UIViewController, CardPaymentDelegate {

  func paymentDidComplete(with status: PaymentStatus) {
    if(status == .PaymentSuccess) {
      // Payment was successful
    } else if(status == .PaymentFailed) {
       // Payment failed
    } else if(status == .PaymentCancelled) {
      // Payment was cancelled by user
    }
  }


  func authorizationDidComplete(with status: AuthorizationStatus) {
    if(status == .AuthFailed) {
      // Authentication failed
      return
    }
    // Authentication was successful
  }

  // On creating an order, call the following method to show the card payment UI
  func showCardPaymentUI(orderResponse: OrderResponse) {
    let sharedSDKInstance = NISdk.sharedInstance
    sharedSDKInstance.showCardPaymentViewWith(cardPaymentDelegate: self,
                                          overParent: self,
                                          for: orderResponse)
  }
}
// Import the SDK at the top of your viewcontroller file
#import <NISdk/NISdk-Swift.h>

// Implement  CardPaymentDelegate methods to receive events related to card payment

@implementation YourViewController

- (void)paymentDidCompleteWith:(enum PaymentStatus)status {
    if(status == PaymentStatusPaymentSuccess) {
       // Payment was successful
    } else if(status == PaymentStatusPaymentFailed) {
      // Payment failed
    } else if(status == PaymentStatusPaymentCancelled) {
      // Payment Cancelled
    }
}

// On creating an order, call the following method to show the card payment UI
- (void)showCardPaymentUI:(OrderResponse*)orderResponse {
  NISdk *sdkInstance = [NISdk sharedInstance];
  [sdkInstance showCardPaymentViewWithCardPaymentDelegate:
   self.cardPaymentDelegate
   overParent:(UIViewController *) self
   for: orderResponse];
}

@end
Note
cardPaymentDelegate is the delegate class that implements the cardPaymentDelegate protocol. This protocol has methods that are called for various events related to card Payment.
parentViewController is the viewcontroller over which the card payment ui should be presented
order is the orderResponse that was received from the order API performed in step 1.
2. Accepting payments for an order using Apple Pay
To accept payments using Apple Pay, you need to first create a merchant ID and configure your iTunes account to enable Apple Pay. Visit our Apple Pay on enabling Apple Pay in your account
After you have enabled Apple Pay, you can . configure your app to receive payment via Apple Pay by following the subsequent steps.
i. Create the PKPaymentRequest object
For more information on the PKPaymentRequest Class head over to the Apple Docs
We have added a sample code snippet to create a PKPaymentRequest
func createPKPaymentRequest(purchasedItems: [PurchasedItems], paymentAmount: Double) {
  paymentRequest = PKPaymentRequest()
            paymentRequest?.merchantIdentifier = merchantId
            paymentRequest?.countryCode = "AE"
            paymentRequest?.currencyCode = "AED"
            paymentRequest?.requiredShippingContactFields = [.postalAddress, .emailAddress, .phoneNumber]
            paymentRequest?.merchantCapabilities = [.capabilityDebit, .capabilityCredit, .capability3DS]
            paymentRequest?.requiredBillingContactFields = [.postalAddress, .name]
            paymentRequest?.paymentSummaryItems = self.purchasedItems.map { PKPaymentSummaryItem(label: $0.name, amount: NSDecimalNumber(value: $0.amount)) }
            paymentRequest?.paymentSummaryItems.append(PKPaymentSummaryItem(label: "Total", amount: NSDecimalNumber(value: paymentAmount)))
}
- (void)createPkPaymentRequest:(NSArray<PurchasedItems*>*) purchasedItems, and:(Double)paymentAmount {
  self.paymentRequest.merchantIdentifier = merchantId;
        self.paymentRequest.countryCode = @"AE";
        self.paymentRequest.currencyCode = @"AED";
        self.paymentRequest.requiredShippingContactFields = [[NSSet alloc] initWithObjects: PKContactFieldPostalAddress, PKContactFieldEmailAddress, PKContactFieldPhoneNumber, nil];
        self.paymentRequest.merchantCapabilities = PKMerchantCapabilityDebit | PKMerchantCapabilityCredit | PKMerchantCapability3DS;
        self.paymentRequest.requiredBillingContactFields = [[NSSet alloc] initWithObjects: PKContactFieldPostalAddress, PKContactFieldName, nil];
        NSMutableArray<PKPaymentSummaryItem *> *summaryItems = [[NSMutableArray alloc] initWithCapacity: purchasedItems.count + 1];
        for (Product *item in self.purchasedItems) {
            [summaryItems addObject: [PKPaymentSummaryItem
                                      summaryItemWithLabel: item.name
                                      amount: [[NSDecimalNumber alloc] initWithFloat: item.amount]]];
        }
        [summaryItems addObject: [PKPaymentSummaryItem
                                  summaryItemWithLabel: @"Total"
                                  amount: [[NSDecimalNumber alloc] initWithFloat: paymentAmount]]];
        self.paymentRequest.paymentSummaryItems = summaryItems;
}
You can also refer our following sample apps where the Apple Pay flow is demonstrated.
Apple Pay EMV support
NGenius does not support the
emvpayment type yet for Apple Pay. Please avoid adding.capabilityEMVin thepaymentRequest?.merchantCapabilitiesof the Apple Pay request.
ii. Present the Apple Pay ViewController
You can present the Apple Pay view controller by calling on the NISdk's initiateApplePay method as follows
func presentApplePay() {
  let sharedSDKInstance = NISdk.sharedInstance
  sharedSDKInstance.initiateApplePayWith(applePayDelegate:
                                         self?.cardPaymentDelegate as? ApplePayDelegate,
                                         cardPaymentDelegate: (self?.cardPaymentDelegate)!,
                                         overParent: self?.cardPaymentDelegate as!UIViewController,
                                         for: orderResponse, with: self!.paymentRequest!)
}
-(void)presentApplePay {
  NISdk *sdkInstance = [NISdk sharedInstance];
  [sdkInstance initiateApplePayWithApplePayDelegate: (id<ApplePayDelegate>)weakSelf.cardPaymentDelegate
                                cardPaymentDelegate: weakSelf.cardPaymentDelegate
                                         overParent: (UIViewController *)weakSelf.cardPaymentDelegate
                                                for: orderResponse
                                               with: self.paymentRequest];
}
Note
In the above method calls
cardPaymentDelegate is the cardPaymentDelegate implementation
parent is the view controller over which you would like the apple pay controller to be displayed
orderResponse is the order Response received after creating the order
paymentRequest is the Passkit Payment request object that you create. For more info see PKPaymentRequest from Apple
Changing SDK language
You can change the language of the sdk by using the respective language prefix as follows
NISdk.sharedInstance.setSDKLanguage(language: "ar")
[[NISdk sharedInstance] setSDKLanguageWithLanguage:@"ar"];