Google Pay™ is a payment wallet solution which allows users of Android devices to make seamless card backed payments. Support for Google Pay can help improve both conversion and your customer experience, and is rapidly becoming a leading payment option in the region.
Before you start,
Accepting Google Pay™ payments through your N-Genius Online account relies on a number of pre-requisites, which you must be able to satisfy:
- A valid and enrolled Google Pay™ developer account (personal or organization)
- An Andriod app integrated with N-Genius Online
You can integrate Google Pay™ with N-Genius by the following methods
- Using the N-Genius Andriod SDK
- Direct Api Integration
Configuring Google Pay™:
To start accepting payments from Google Pay™ users, follow these steps:
- Log in to your N-Genius Online portal.
- Navigate to Settings > Organisational Hierarchy.

- In the Organizational Hierarchy screen, find the Payment Channels configuration option.
- You will see various tabs representing different payment channels. Check how many are already configured.
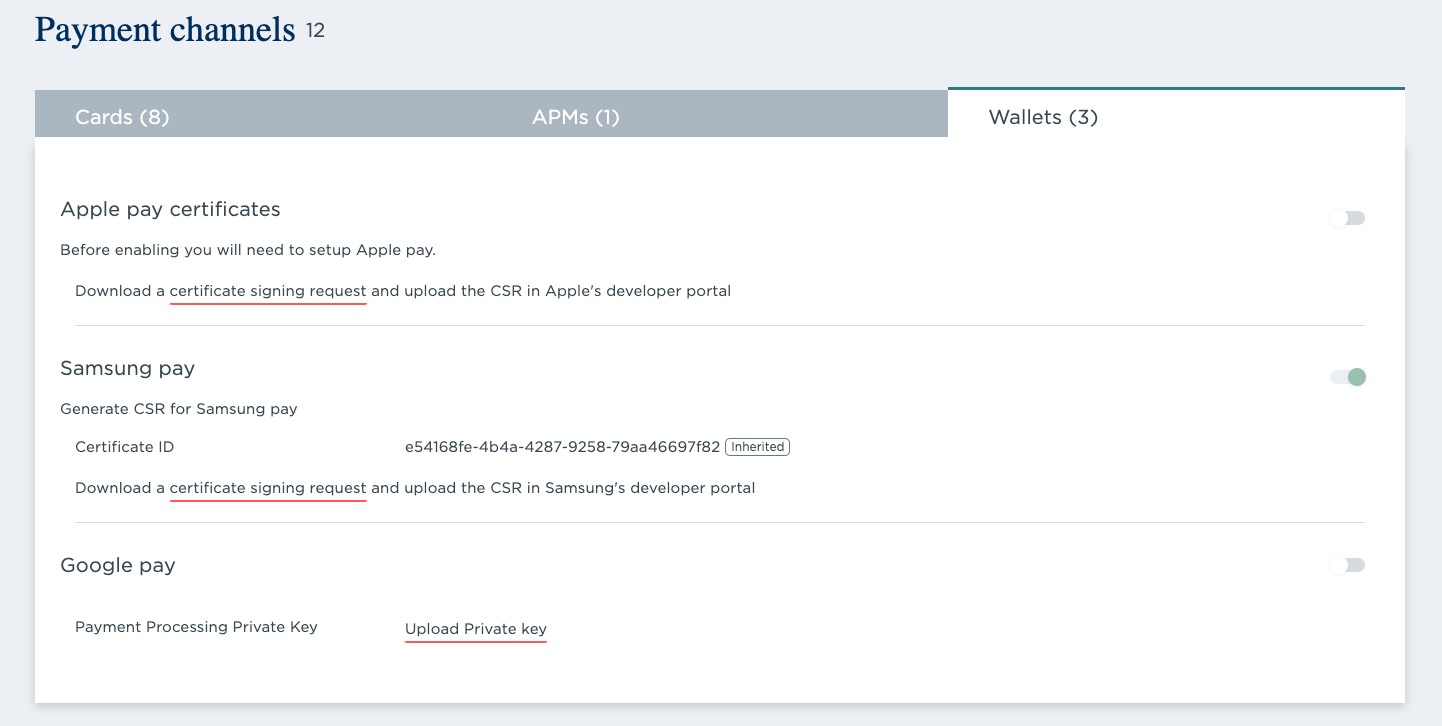
- Switch to the Wallets tab to set up your Google Pay integration.

- Generate your Private/Public keys by following the link.
- Access your Google Pay™ Business Account and upload the Public Key.
- Upload the Private Key in the Google Pay™ Certificate section.
Access the Google Pay Console:Navigate to the Google Pay™ Console using the following link:
https://pay.google.com/business/console/payment/{{Merchant Id}}Remember to replace {{Merchant Id}} with your actual merchant ID to access the console.
- In the N-Genius portal, click on Upload Private Key to upload your private key.
- After uploading the private key, your Google Pay™ integration will be fully set up on your N-Genius Online account.

Integrating Google app in-app
There are two ways to setup and configure Google Pay™ in your Andriod app
- NGenius SDK - Use the sdk to quickly integrate Google Pay™. (Order types supported: "PURCHASE","AUTH","SALE")
- Direct API - You can directly integrate using the Google Pay™ and NGenius apis to get more control.
Google Pay (Direct API):
- Use TinkLibrary To Decrypt Received Response that you will get from Google.
- Extract pan , expirationMonth, expirationYear, cryptogram, and eciIndicator.
- Create the below object, to send it for the API.
{
  "primaryAccountNumber": "pan",
  "expiry": "expirationYear/expirationMonth",
  "eci": "eciIndicator",
  "cryptogram": "cryptogram"
}
-
Create the order on Gateway
Please refer the order creation API for creating an order on the gateway. Two stage payments -
Authorize the transaction on N-Genius
- The order created should be authorised to obtain a paymentToken which is used to further post the Google Pay™ encrypted object to N-Genius and process the payment.
- The authorization link can be obtained from the order response object. A sample key path is shown below to fetch the payment link
{
  "_links": {
    "payment-authorization": {
      "href": "*https://payment-auth-link*"
    }
  }
}
A payment token can be requested By making a POST request to the above link.
HTTP Method: POST
| Header | Value |
|---|---|
| Accept | application/vnd.ni-payment.v2+json |
| Media-Type | application/x-www-form-urlencoded |
| Content-Type | application/x-www-form-urlencoded |
- Post the Google Pay™ encrypted object to N-Genius
When the user selects a card from the Google Pay™ interface and authorizes a transaction, an encrypted object is received from Google which needs to be posted to N-Genius in order to process the transaction and charge the customer.
HTTP Method: PUT
Body data: object that you've created in the second step.
| Header | Value |
|---|---|
| Authorization | Bearer" + paymentToken |
| Content-Type | application/vnd.ni-payment.v2+json |
In the above request header, payment token is the token that is received during the authorization step
The body data is the json that you’ve created on the second step.