We support two methods of accepting payments via Samsung Pay
- Samsung Pay web
- Samsung Pay in-app (native Android apps)
The two methods can be used in the Hosted Payment Page and with the N-Genius Online Andriod SDKs as well as a Direct API integration method. (Order types supported by the SDK: "AUTH","SALE")
In this section the following integration guides are:
- Enable Samsung Pay web on Hosted Payment Page
- Samsung Pay in App on N-Genius Online Andriod SDK
- Samsung Pay Web Integration using a Direct API integration method
- Samsung Pay in App using a Direct API integration method
1. Samsung Pay web on Hosted Payment Page enablement
To enable Samsung Pay on the hosted payment page, contact our support.
2. Samsung Pay in App on N-Genius Online Andriod SDK
To enable Samsung Pay in your app, use the N-Genius SDK for Android for a quick start.
Step 1: Add the dependency to your build.gradle file
implementation 'com.github.network-international.payment-sdk-android:payment-sdk-samsungpay:1.0.0'
Step 2: Add the Samsung Pay credentials in your App.manifest file. The fields that needs to be added is explained in the below snippet.
<meta-data
   android:name="debug_mode"
   android:value="Y"
/>
<meta-data
   android:name="spay_debug_api_key"
   android:value="debug api key from your samsung account"
/>
<meta-data
   android:name="spay_sdk_api_level"
   android:value="2.18"
/>
Note: Android R OS (if the target SDK version is 30), you must include the following
element in the Android manifest.
<manifest xmlns:android="http://schemas.android.com/apk/res/android"
xmlns:tools="http://schemas.android.com/tools">
…
<queries>
<package android:name="com.samsung.android.spay" />
<package android:name="com.samsung.android.samsungpay.gear" />
</queries>
Samsung Pay account credentials
You should have already setup a Samsung Pay account and should a generated a Service and Test App record in the Samsung Pay portal
Samsung Pay Debug Api key can be found in the service tab
Step 3: import the SDK and implement the SamsungPayResponse interface
import com.github.network-international.payment-sdk-android.PaymentClient

@WorkerThread
fun initiateSamungPay(order: Order) {
    paymentClient.launchSamsungPay(order, "MerchantName", this)
}
The SamsungPayResponse interface has two methods onSuccess and onFailure which are called when the Samsung Pay transaction succeeds or fails respectively
override fun onSuccess() {
    view.showProgress(false)
    view.showSnackBar("Transaction successful")
}

override fun onFailure(error: String) {
    view.showProgress(false)
    view.showSnackBar("Transaction Failed $error")
}
3. Samsung Pay Web Integration (Direct API)
Step 1: Merchant’s web pay page should add Samsung Pay’s web SDK (included as a script tag in their HTML document)
Step 2: Merchant’s pay page should get the values necessary for Samsung pay sdk by accessing the following endpoint from the gateway.
In the following Rest request, orderRef and paymentRef can be obtained from the orderResponse during order creation.
POST /api/outlets/outletRef/orders/orderRef/payments/paymentReference/samsung-pay
	BODY { “cancelUrl”: “url to redirect on cancel”, “successUrl”: “url to redirect on success”}
	RESPONSE { id, href, serviceId, callbackUrl, cancelUrl, encInfo }
Step 3: Load the Samsung Pay SDK with the values received in the above response.
SamsungPaySDK.connect(
	  id,
	  href,
	  serviceId,
	  callbackUrl, // callback url on success
	  cancelUrl, // cancel url
	  'uk', // country code
	  encInfo.mod,
	  encInfo.exp,
	  encInfo.keyId
	);
Step 4: On successful validation of Samsung Pay transaction, the user will be redirected to the successUrl. The merchant can then display appropriate success/failure message by fetching the order again.
4. Samsung Pay in-app Integration (Direct API integration)
The merchant can use the N-Genius APIs in conjunction with the Samsung Pay Android SDK to integrate Samsung Pay inside his native Android app.
The following are the steps
Step 1: Signup and setup the Samsung Pay developer account
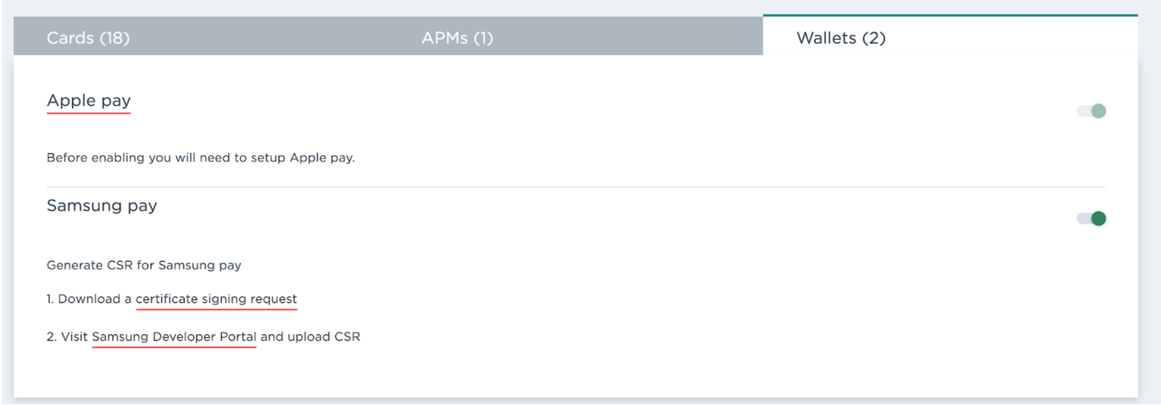
Step 2: Download CSR from the N-Genius portal.
In order to begin accepting payments from Samsung Pay users, you must first navigate to your N-Genius Online portal, log-in and browse to the Settings > Organisational hierarchy screen, and find the 'Payment channels' configuration option.
On the next screen, you will see a number of tabs indicating each type of payment channel, and how many are already configured.
Switch to the 'Wallets' tab to configure your Samsung Pay integration.
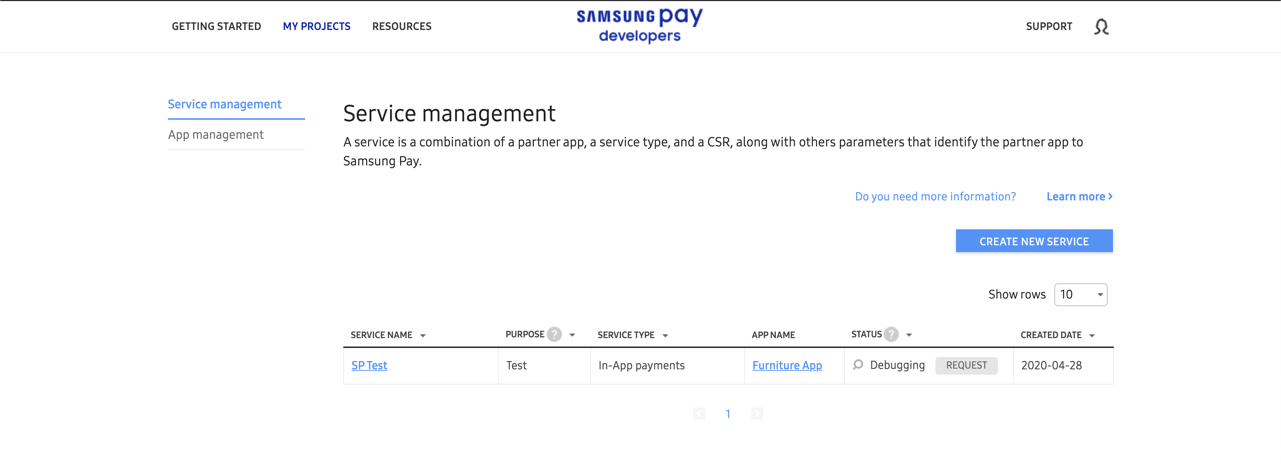
Step 2: Create a service in Samsung Pay’s developer portal and add Samsung Pay test account emails to it. The CSR downloaded from the N-Genius portal should be uploaded in this step.
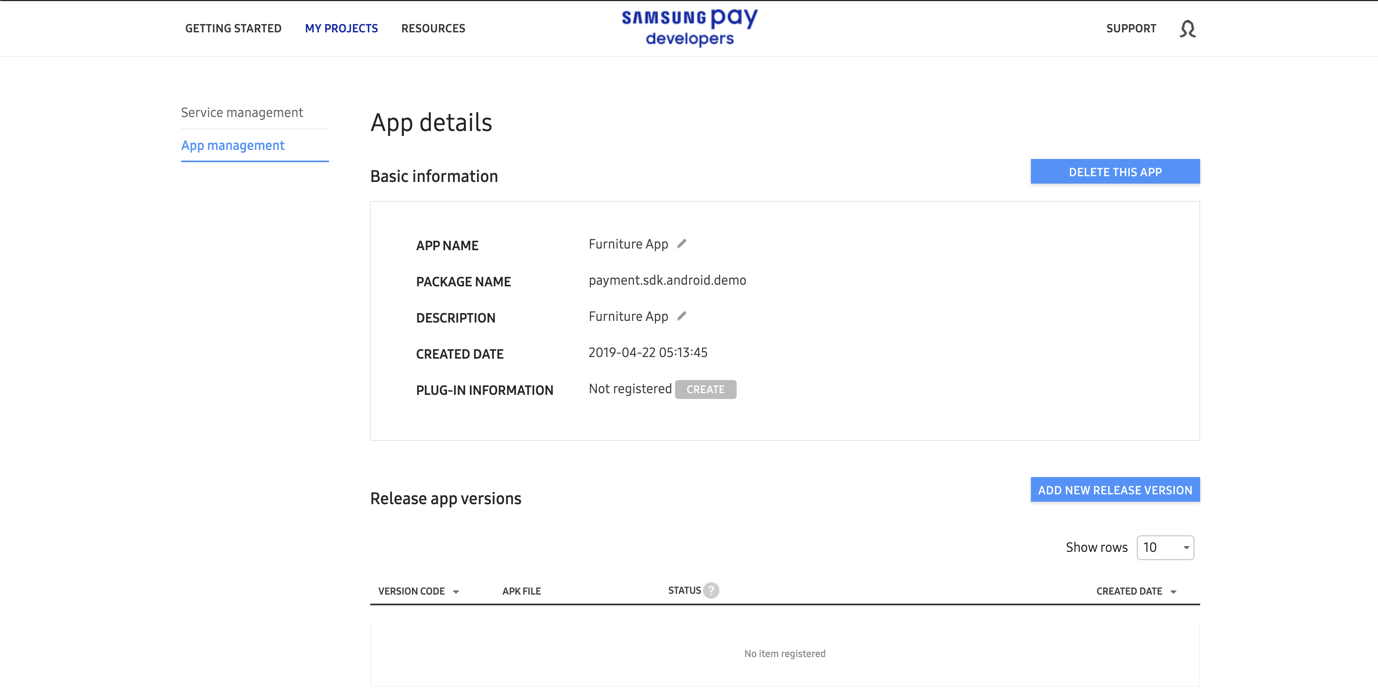
Step 3: Create a new App record with the package name matching with the package name of your app found in the manifest.xml file in your Android project.
Step 4: Download the Samsung Pay Android sdk from Samsung Pay’s developer portal
Step 5: Add the downloaded Samsung Pay sdk (jar file) inside the lib folder of your android project. You can refer to Samsung Pay’s Android integration guide for more details. Refer the following link to add a library to an Android project. https://stackoverflow.com/a/35241990/2041906
Step 6: Integrate with the SDK
The following flow diagram explains the data flow during a Samsung Pay transaction.
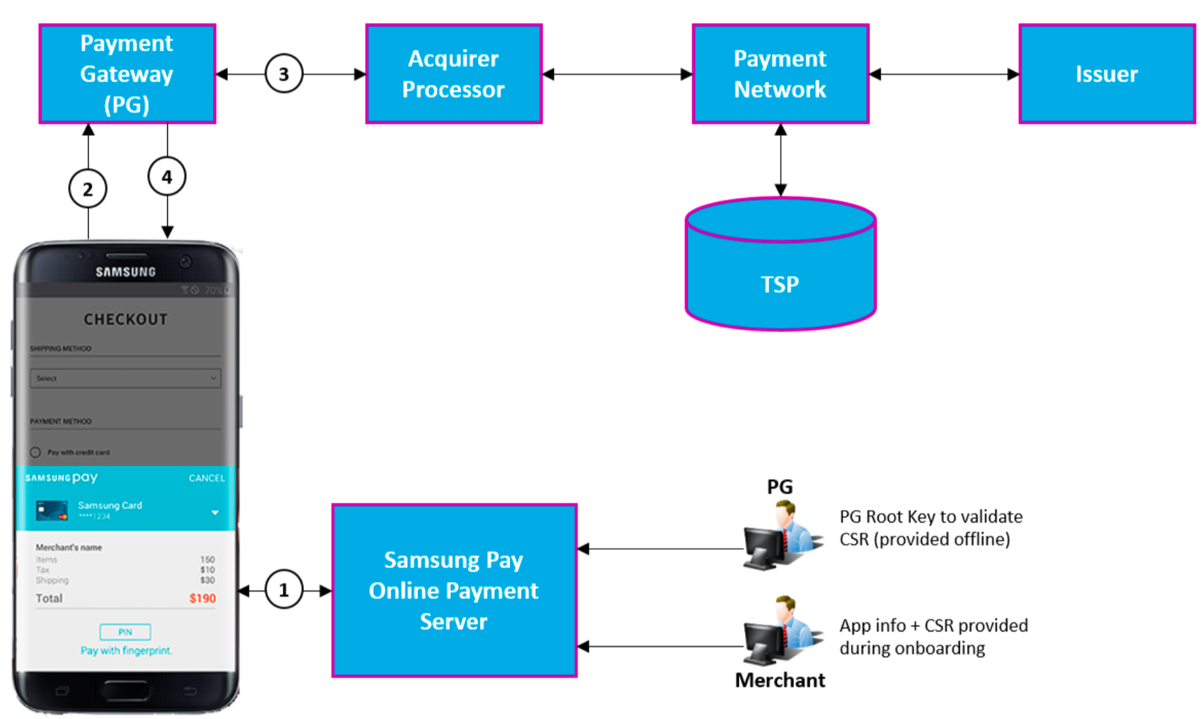
Call the getSamsungPayStatus from the Samsung Pay sdk to check the availability of Samsung Pay on the customer device
protected void updateSamsungPayButton() {
 	    Bundle bundle = new Bundle();
	    bundle.putString(SamsungPay.PARTNER_SERVICE_TYPE, SamsungPay.ServiceType.INAPP_PAYMENT.toString());
	    PartnerInfo partnerInfo = new PartnerInfo(serviceId, bundle);
	    SamsungPay samsungPay = new SamsungPay(context, partnerInfo);
	    try {

	        /*
	         * Method to get the Samsung Pay status on the device.
	         * Partner (Issuers, Merchants, Wallet providers, and so on) applications must call this method to
	         * check the current state of Samsung Pay before doing any operation.
         */
	            samsungPay.getSamsungPayStatus(new StatusListener() {
	            @Override
	            public void onSuccess(int status, Bundle bundle) {
	                switch (status) {
	                    case SamsungPay.SPAY_NOT_SUPPORTED: // Samsung Pay is not supported
	                        Toast.makeText(context, "Samsung Pay is not supported", Toast.LENGTH_LONG).show();
	                        break;
	                    case SamsungPay.SPAY_NOT_READY: // Activate Samsung Pay or update Samsung Pay, if needed.
	                        Toast.makeText(context, "Activate Samsung Pay or update Samsung Pay, if needed.", Toast.LENGTH_LONG).show();
	                        break;
	                    case SamsungPay.SPAY_READY: // Perform operation
	                        Toast.makeText(context, "All good", Toast.LENGTH_LONG).show();
	                        break;
	                    case SamsungPay.SPAY_NOT_ALLOWED_TEMPORALLY:
	                        Toast.makeText(context, "Samsung Pay is not allowed temporarily", Toast.LENGTH_LONG).show();
	                        break;
	                    default: // Not expected result. (option)
	                        Toast.makeText(context, "Not expected", Toast.LENGTH_LONG).show();
	                        break;
	                }
	            }

	            @Override
	            public void onFail(int errorCode, Bundle bundle) {
	                Toast.makeText(context, errorCode, Toast.LENGTH_LONG).show();
             }
	        });
	    } catch (NullPointerException e) {
	        e.printStackTrace();
	    }
	}
Create the amount and address controllers and the necessary callbacks to allow communication of amount and address changes between the merchant app and Samsung Pay’s sheet. The onSuccess callback configure below will be called by the Samsung Pay SDK once the transaction is completed. The merchant App should use this callback to post the encrypted object to transaction service.
private PaymentManager.CustomSheetTransactionInfoListener transactionListener = new PaymentManager.CustomSheetTransactionInfoListener() {

	        @Override
	        public void onCardInfoUpdated(CardInfo cardInfo, CustomSheet customSheet) {
	            AmountBoxControl amountBoxControl = (AmountBoxControl) customSheet.getSheetControl(AMOUNT_CONTROL_ID);
	            amountBoxControl.updateValue("PRODUCT_ITEM_ID", (double)order.amount.getValue() / 100); //item price
	            amountBoxControl.setAmountTotal((double)order.amount.getValue() / 100, AmountConstants.FORMAT_TOTAL_PRICE_ONLY); // grand total
	            customSheet.updateControl(amountBoxControl);
	            try {
	                paymentManager.updateSheet(customSheet);
	            } catch (IllegalStateException | NullPointerException e) {
	                e.printStackTrace();
	            }
	        }

	        @Override
	        public void onSuccess(CustomSheetPaymentInfo response, String paymentCredentials, Bundle bundle) {
	            try {
	                postToTxnService(paymentCredentials);
	                String DPAN = response.getCardInfo().getCardMetaData().getString(SpaySdk.EXTRA_LAST4_DPAN, "");
	                String FPAN = response.getCardInfo().getCardMetaData().getString(SpaySdk.EXTRA_LAST4_FPAN, "");
	                Toast.makeText(context, "DPAN: " + DPAN + "FPAN: " + FPAN, Toast.LENGTH_LONG).show();
	            } catch (NullPointerException e) {
	                e.printStackTrace();
	            }
	            Toast.makeText(context, "Transaction : onSuccess", Toast.LENGTH_LONG).show();
	        }

	        @Override
	        public void onFailure(int errorCode, Bundle bundle) {
	            Toast.makeText(context, "Transaction : onFailure : " + errorCode, Toast.LENGTH_LONG).show();
	        }
	    };

	    private AmountBoxControl makeAmountControl() {
	        AmountBoxControl amountBoxControl = new AmountBoxControl(AMOUNT_CONTROL_ID, CURRENCY_CODE);
	        amountBoxControl.addItem("PRODUCT_ITEM_ID", "Item", ORDER_AMOUNT, null);
	        amountBoxControl.setAmountTotal(ORDER_AMOUNT, AmountConstants.FORMAT_TOTAL_PRICE_ONLY); // grand total
	        return amountBoxControl;
	    }


	    private CustomSheetPaymentInfo makeCustomSheetPaymentInfo() {
        ArrayList<PaymentManager.Brand> brandList = new ArrayList<>();

	        brandList.add(PaymentManager.Brand.VISA);
	        brandList.add(PaymentManager.Brand.MASTERCARD);
	        brandList.add(PaymentManager.Brand.AMERICANEXPRESS);

	        CustomSheet customSheet = new CustomSheet();
	        customSheet.addControl(makeAmountControl());

	        return new CustomSheetPaymentInfo
	                .Builder()
	                .setMerchantName("Furniture Store")
	                .setOrderNumber("007")
	                .setAllowedCardBrands(brandList)
	                .setCardHolderNameEnabled(true)
	                .enableEnforcePaymentSheet()
	                .setMerchantCountryCode("AE")
	                .setCardHolderNameEnabled(true)
	                .setRecurringEnabled(false)
	                .setCustomSheet(customSheet)
	                .build();
	    }
Call Samsung Pay’s startInAppPayWithCustomSheet to open the Samsung Pay UI.
public void startSamsungPayInApp() {
	        try {
	            Bundle bundle = new Bundle();
	            bundle.putString(SamsungPay.PARTNER_SERVICE_TYPE, SamsungPay.ServiceType.INAPP_PAYMENT.toString());
	            PartnerInfo partnerInfo = new PartnerInfo(serviceId, bundle);
	            paymentManager = new PaymentManager(context, partnerInfo);
	            paymentManager.startInAppPayWithCustomSheet(makeCustomSheetPaymentInfo(), transactionListener);
	        } catch (IllegalStateException | NullPointerException | IllegalArgumentException e) {
	            e.printStackTrace();
	        }
	    }
Post encrypted object to gateway
void postToTxnService(String encryptedObject) {
	        final MediaType JSON = MediaType.get("application/vnd.ni-payment.v2+json");
	        RequestBody body = RequestBody.create(encryptedObject, JSON);
	        Request request = new Request.Builder()
	                .url(order.embedded.payment[0].links.samsungPayLink.href)
	                .addHeader("Content-Type", "application/vnd.ni-payment.v2+json")
	                .addHeader("Accept", "application/vnd.ni-payment.v2+json")
	                .addHeader("Authorization", "Bearer " + authTokens.get("payment-token"))
	                .put(body)
	                .build();

	        SamsungPayAcceptHandler samsungPayAcceptHandler = new SamsungPayAcceptHandler(this);
	        try {
	            HttpClient client = new HttpClient();
	            client.run(request, samsungPayAcceptHandler);
	        } catch (Exception e) {
	            e.printStackTrace();
	        }
	    }
In order to post to gateway, a payment token is needed which can be obtained by using the payment-authorization url found in the order response. This would return the payment token and access-token as set-cookie header which can be extracted and used in the put request for posting the encrypted object to the gateway.
The authorization response handler would look like the following to extract the payment-token and access-token.
public void onSuccess(String jsonResponse, Response response) {
	        List<String> setCookieHeaders = new ArrayList<>(response.headers("Set-Cookie"));
	        HashMap<String, String> authTokens = new HashMap<String, String>();
	        for (String header: setCookieHeaders) {
	            String[] tokenComponents = header.split(";"); // Split and remove other attributes
	            String[] token = tokenComponents[0].split("="); // Split the name and token separately
	            authTokens.put(token[0], token[1]);
	        }
	        orderActions.setPaymentTokenAndInitiateSamsungPay(authTokens);
	    }
ProGuard Rules
If your app(s) have any issue with ProGuard, the following rules are recommended:
dontwarn com.samsung.android.sdk.samsungpay.**
-keep class com.samsung.android.sdk.** { *; }
-keep interface com.samsung.android.sdk.** { *; }
When DexGuard is employed, the following additional rules apply:
-keepresourcexmlelements manifest/application/meta-data@name=debug_mode
-keepresourcexmlelements manifest/application/meta-data@name=spay_debug_api_key
-keepresourcexmlelements manifest/application/meta-data@name=spay_sdk_api_level
FAQ & Troubleshooting
Q: If the Samsung Pay app throws ERROR_NOT_ALLOWED (-6) /
ERROR_UNABLE_TO_VERIFY_CALLER (-359), what needs to be checked on the
partner app side?
In Test Mode
- Verify that "debug_mode" is set as "Y" in your Android Manifest.
- Verify that your "spay_debug_api_key" is valid in Android Manifest. Go to the Samsung Pay
Developers
portal, sign in, and open your service details to check/retrieve the correct debug API key. - Verify that your "spay_debug_api_key" has not expired.
- Verify that the "serviceId" is correct; make sure it was generated for the test mode and not for
release. - Verify that the “serviceType” is correct; make sure it is same as the value assigned by the
Samsung Pay Developers portal when you create the service. - Verify that the device’s Samsung Account is registered (allowed) under TEST ACCOUNTS in
the service details.
For release
- Verify that "debug_mode" is set as "N" in your Android Manifest.
- Verify that "spay_debug_api_key" is not defined in your Android Manifest (it must be an empty
string or
""). - Verify that the "serviceId" is correct; make sure it was generated for release and not for the test
mode. - Verify that the “serviceType” is correct; make sure it is same as the value assigned by the
Samsung Pay
Developers portal when you create the service. - Ask your Samsung Pay relationship manager (RM) to confirm that the status of your service is
"Approved".
Q: I received an onSuccess() callback for a getAllCards() response but the
card list is empty even though there already one or more installed cards in
SamsungPay.
The most common reason for returning an empty card list is a mismatch between the issuer name
registered on the Samsung Pay Developers portal and the actual issuer name for the card.
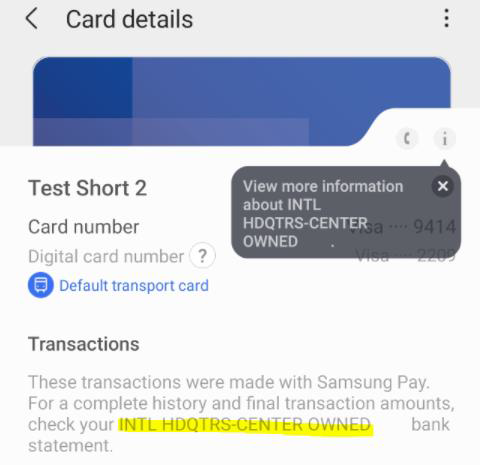
If you cannot confirm the actual issuer name of the card, just enroll the card with SamsungPay and see
its detail information. Below is a sample screen shot of the test card, with the issuer name highlighted
in yellow.
For other issues and additional information, visit our FAQ page at: https://us-partner.pay.samsung.com/
developers/support/faq.
Q: Which Devices support Samsung Pay
The initial devices launched with Samsung Pay are listed on the supported devices page.