Step 1: Install the iOS SDK
The N-Genius iOS SDK supports apps running on iOS 11 or later. You can install the SDK using Swift Package Manager, CocoaPods, or Carthage, depending on your project setup.
Option 1: Swift Package Manager (Recommended)
-
Open your project in Xcode.
-
Go to File > Add Packages.
-
Enter the SDK repository URL:
https://github.com/network-international/payment-sdk-ios -
Choose the version range and add the package to your target.
Swift Package Manager offers a seamless setup and is preferred for most modern iOS projects.
Option 2: CocoaPods
- Create or edit your
Podfilein the root of your project:
target 'YourAppTarget' do
  use_frameworks!
  pod 'NISdk'
end- Run the following in Terminal:
pod install- Open the generated
.xcworkspacefile in Xcode.
Option 3: Carthage
If you're using Carthage:
-
Create a
Cartfilein your project root:touch Cartfile -
Add the SDK reference:
1. github "network-international/payment-sdk-ios" -
Run the following to fetch dependencies:
carthage update -
Link the framework:
- Drag
NISdk.frameworkfromCarthage/Build/iOSinto your app's Linked Frameworks and Libraries in the project settings.
- Drag
-
Add a Run Script Phase to your build:
-
Go to Build Phases > + > New Run Script Phase.
-
Script content:
/usr/local/bin/carthage copy-frameworks -
Input Files:
1. $(SRCROOT)/Carthage/Build/iOS/NISdk.framework -
Output Files:
1. $(BUILT_PRODUCTS_DIR)/$(FRAMEWORKS_FOLDER_PATH)/NISdk.framework
-
Next Steps
Once the SDK is installed, you’re ready to initialize it and start integrating payments into your app. Continue to Step 2: Configure the SDK ›
Step 2: Using the SDK
Once the SDK is installed, you’re ready to start processing payments. The typical payment journey begins with creating an order, followed by collecting the customer’s payment via card or Apple Pay.
Before proceeding, ensure you've acquired your authentication credentials. For help with this step, please contact your onboarding representative.
1. Creating an Order
To accept in-app payments, an order must first be created via your backend.
- Your mobile app sends the order request to your backend server.
- Your backend then calls the N-Genius Order API to generate the order securely.
Integrate the order API on your server using this guide.
For details on creating orders via the API, see our Create Order guide.
A sample merchant server is also available for reference.
Server-side order creation is crucial for credential protection.
2. Accepting Card Payments
Once the order is created, you can present the card payment UI in your app.
Import the SDK into your view controller:
import NISdkImplement CardPaymentDelegate methods to handle payment events:
class YourViewController: UIViewController, CardPaymentDelegate {

  func paymentDidComplete(with status: PaymentStatus) {
    switch status {
    case .PaymentSuccess:
      // Payment succeeded
    case .PaymentFailed:
      // Payment failed
    case .PaymentCancelled:
      // User cancelled payment
    }
  }

  func authorizationDidComplete(with status: AuthorizationStatus) {
    if status == .AuthFailed {
      // Authentication failed
    }
    // Authentication successful
  }

  func showCardPaymentUI(orderResponse: OrderResponse) {
    let sdk = NISdk.sharedInstance
    sdk.showCardPaymentViewWith(
      cardPaymentDelegate: self,
      overParent: self,
      for: orderResponse
    )
  }
}
Note:
CardPaymentDelegatehandles all payment-related events.
overParentrefers to the view controller presenting the payment UI.
orderResponseis returned from the Order API.
3. Accepting Apple Pay Payments
To enable Apple Pay in your app:
- Create a Merchant ID in your Apple Developer account.
- Enable Apple Pay in your app capabilities.
- Configure your iTunes account to accept Apple Pay.
See Enable Apple Pay for a full guide.
i. Create a PKPaymentRequest
PKPaymentRequestfunc createPKPaymentRequest(items: [PurchasedItems], total: Double) {
let paymentRequest = PKPaymentRequest()
paymentRequest.merchantIdentifier = merchantId
paymentRequest.countryCode = "AE"
paymentRequest.currencyCode = "AED"
paymentRequest.requiredShippingContactFields = [.postalAddress, .emailAddress, .phoneNumber]
paymentRequest.requiredBillingContactFields = [.postalAddress, .name]
paymentRequest.merchantCapabilities = [.capabilityDebit, .capabilityCredit, .capability3DS]
paymentRequest.paymentSummaryItems = items.map {
PKPaymentSummaryItem(label: $0.name, amount: NSDecimalNumber(value: $0.amount))
}
paymentRequest.paymentSummaryItems.append(
PKPaymentSummaryItem(label: "Total", amount: NSDecimalNumber(value: total))
)
}
Check out the included Swift and Objective-C example apps in this repository; they'll help you integrate the SDK.
ii. Present the Apple Pay Sheet
func presentApplePay() {
  let sdk = NISdk.sharedInstance
  sdk.initiateApplePayWith(
    applePayDelegate: self as? ApplePayDelegate,
    cardPaymentDelegate: self,
    overParent: self,
    for: orderResponse,
    with: paymentRequest
  )
}
Note:
cardPaymentDelegate: your class handling card eventsoverParent: the view controller presenting the Apple Pay sheetorderResponse: returned from the Order APIpaymentRequest: thePKPaymentRequestobject
4. Set the SDK Language (Optional)
You can localise the SDK UI by setting the language:
NISdk.sharedInstance.setSDKLanguage(language: "ar") // ArabicSupported languages include
"en"for English and"ar"for Arabic.
Using 3-D Secure (executeThreeDSTwo)
The executeThreeDSTwo method is used to initiate EMV® 3-D Secure (3DS2) authentication for saved cards (tokenized payments). This helps you combine the convenience of saved cards with the added security of cardholder verification.
This method is most commonly used when integrating saved card (tokenized) payments, providing frictionless but secure user experiences.
Swift Example
NISdk.sharedInstance.executeThreeDSTwo(
    cardPaymentDelegate: self,
    overParent: self,
    for: paymentResponse
)
Parameters
| Parameter | Description |
|---|---|
cardPaymentDelegate | A delegate class that implements CardPaymentDelegate to handle callbacks. |
overParent | The view controller presenting the 3DS UI. |
paymentResponse | The response object from the saved card payment request API. |
paymentResponseshould be the full JSON response returned by the N-Genius server when you initiate a saved card (tokenized) payment.
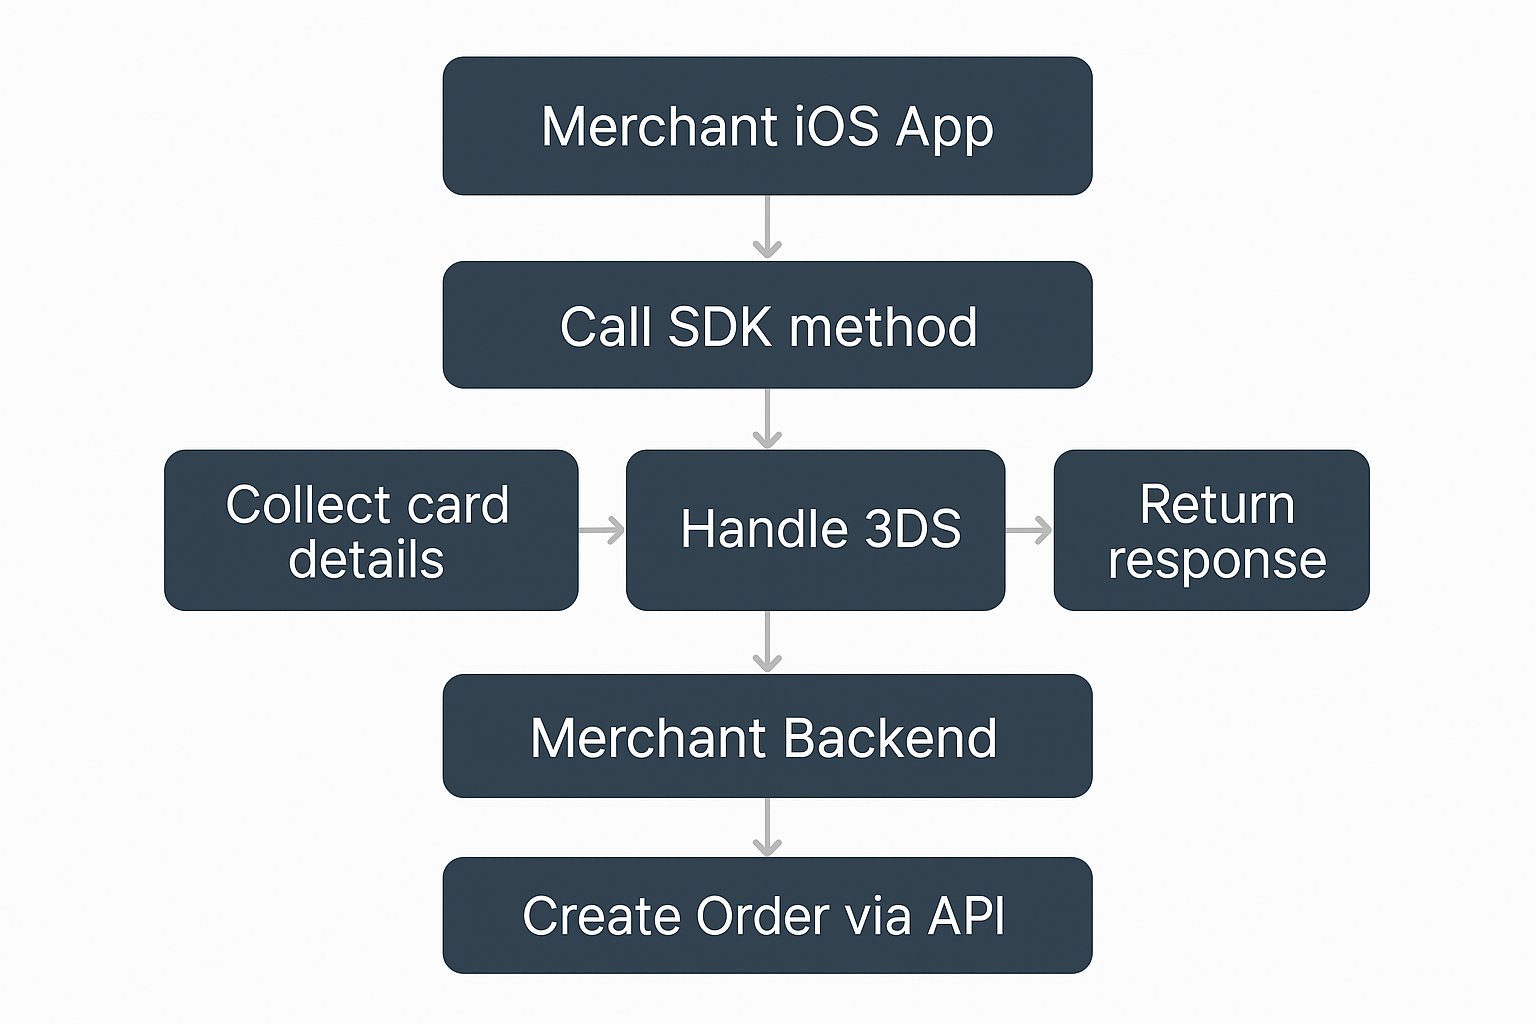
Visual overview of the iOS SDK integration journey — from setup to successful payment
Customizing the SDK UI Theme
The Payment SDK allows you to personalize the look and feel of the payment screens to match your app’s branding. You can customize key visual elements like colors using the SDKColors class.
Example (Swift)
let sdkColors = SDKColors()
sdkColors.primaryColor = UIColor.systemBlue
sdkColors.secondaryColor = UIColor.white
sdkColors.buttonTextColor = UIColor.white
sdkColors.navigationBarTintColor = UIColor.black

NISdk.sharedInstance.setSDKColors(sdkColors)
Customizable Elements
| Property | Description |
|---|---|
primaryColor | Main color used for buttons and highlights |
secondaryColor | Background or accent color |
buttonTextColor | Text color for primary buttons |
navigationBarTintColor | Tint color for navigation elements |
Use this feature to align the payment UI with your brand and deliver a seamless customer experience.
Webhooks and Mobile SDKs
Mobile apps cannot receive Webhooks directly. Because the final payment status is not always known by the time your customer returns to the app, it's important not to rely solely on in-app responses for order completion or fulfilment.
Instead, set the webhookUrl parameter when creating your payment order to point to a trusted server-side endpoint. Your backend will receive asynchronous payment status updates from the payment gateway.
To notify your mobile app of the final payment result:
-
Implement a webhook handler on your backend to listen for payment status updates.
-
Once the payment is confirmed or failed, your backend can trigger an update to the mobile app via one of the following:
- Silent push notification to wake the app and update the UI
- Polling (less efficient, only if push isn’t viable)
- Apple Push Notification service (APNs) with custom payloads
This approach ensures that your app reflects the true final payment status, regardless of whether the app is foregrounded, backgrounded, or closed when the payment is completed.
See our webhooks guide for a complete list of features.