Organisational hierarchy
This page shows your merchant tree and where you view and manage entities: Merchant Organisation → Organisational Units (OU) → Outlets. Use it to navigate scope, manage Payment Channels, add units/outlets, assign TIDs, and activate/deactivate nodes.
Organisational hierarchy
Think of this as your control panel. Each level exposes specific controls: Organisation (Payment Channels, global settings), OU (regional/brand structure, user scope), Outlet (TIDs, payment acceptance). From here you switch scope, manage entities, and control availability.
Glossary (acronyms & terms)
- OU (Organisational Unit): A branch under the Merchant Organisation (e.g., region, brand, department).
- Outlet: A leaf node that takes payments (e.g., store, website).
- Payment Channel: Credentials & settings used to process transactions (e.g., MID, scheme, currency).
- MID (Merchant ID): The identifier issued by the acquirer for a merchant account.
- MCC (Merchant Category Code): ISO 18245 code describing the business type.
- Channel (eCom / MOTO / POS): The capture method for transactions.
- TID (Terminal ID): Identifier assigned to an Outlet; must be unique to that outlet.
Scope & permissions
- Payment Channels are managed at organisation level (view-only lower down).
- Users are assigned at Organisation/OU level (not at Outlet).
- Selecting a node in the profile switcher changes the scope for lists, reports, and settings.
Navigate the hierarchy
- In the top-right profile switcher, click your merchant name.
- Click "Navigate Organisational Hierarchy."
- Use the side panel to browse Organisational Units and Outlets.
- Click Select on the node you want; the portal switches to that scope.
Icons help distinguish OU vs Outlet in the list.
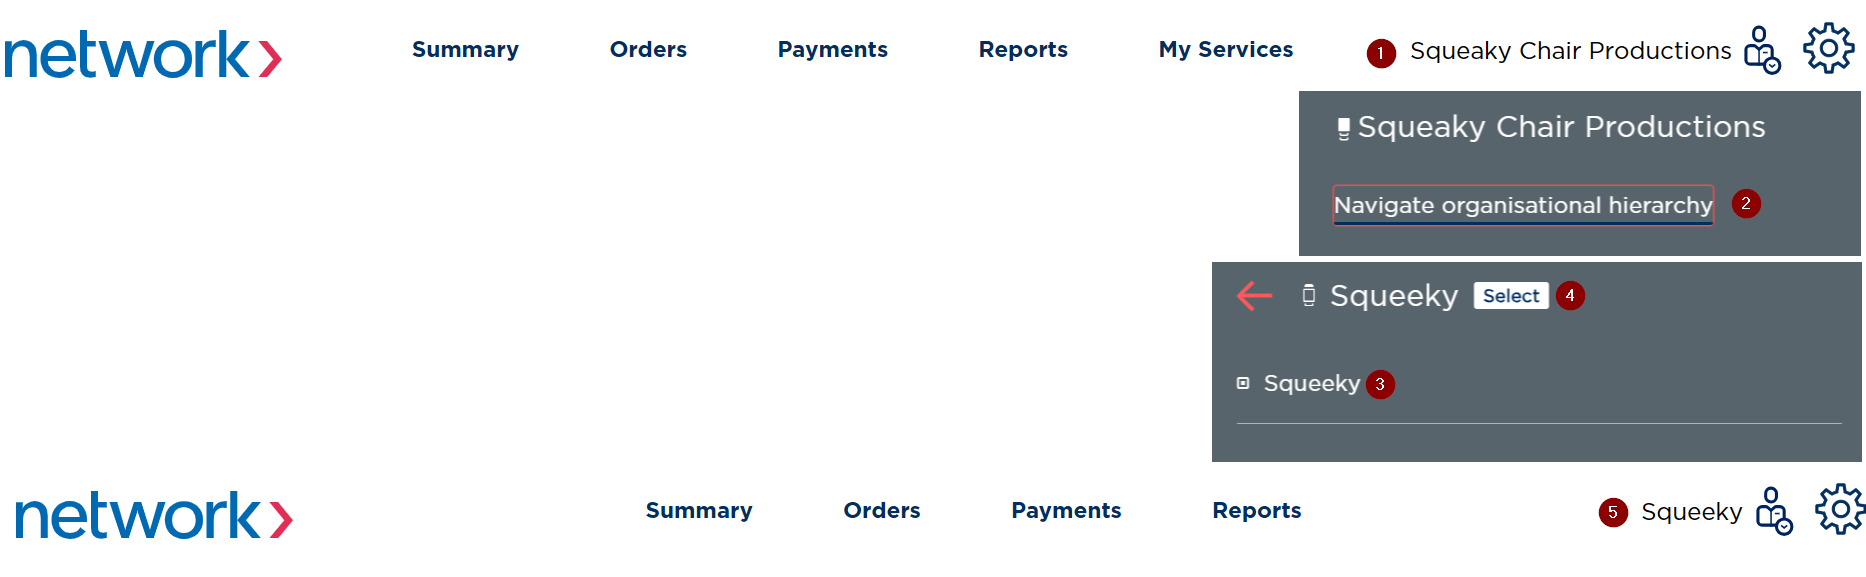
Change scope: 1) Click merchant name → 2) Navigate organisational hierarchy → 3) Choose OU/Outlet → 4) Select → 5) Confirm scope label.
Payment Channels
What they are: The processing “pipes” (one or more per organisation) with attributes like MID, scheme, currency, channel, MCC.
Where to manage:
- View from Organisation or OU scope.
- Enable/Disable only at Organisation scope. Lock icon indicates a higher-level restriction.
View details
- Go to Settings → Organisational hierarchy.
- Open the required node (usually Organisation).
- Click Payment Channels → Edit to view.
Enable/Disable
- At Organisation level, open Payment Channels → Edit.
- Toggle Enable/Disable, then Update.
- Status indicators: green dot = active, red dot = disabled, lock = controlled at higher level.
Disabling a channel doesn’t affect existing transactions (they can still be refunded/voided), but any linked payment page won’t be accessible while disabled.
Add an Organisational Unit or Outlet
- Settings → Organisational hierarchy.
- Navigate to the parent node (Organisation or target OU).
- Click Add organisational unit or outlet.
- Choose Type (OU or Outlet) and Name.
- If adding an Outlet, select TIDs to assign.
- Add to save.
Assign / Unassign TIDs (Outlet)
- Scope to the Outlet.
- Click Edit beside TIDs.
- Select one or more TIDs (or Select all), then Done.
Rule: A TID is unique to one Outlet at a time. Unassign it before re-assigning elsewhere.
Deactivate / Activate nodes
Deactivate an OU/Outlet to prevent new activity while preserving historical data.
- To deactivate an OU, first deactivate all children (its OUs and Outlets).
- To reactivate an Outlet/OU, all parent OUs above it must be active.
Steps
- Open the node.
- Use Deactivate/Activate (based on your permissions).
- Reactivate in reverse order if previously deactivated.
Troubleshooting
- Can’t enable a channel? You may be below organisation level or the channel is locked by a higher-level admin.
- Deactivation blocked? Deactivate children first.
- Can’t assign a user to an Outlet? Users attach to Organisation/OU only.
- Payment page not opening? Check if the channel is disabled.
Related
- Users → /docs/users
- Pay page branding → /docs/pay-page-configuration
- Integrations → /docs/integrations · Webhooks → /docs/webhooks
Updated 5 months ago