Users
On the Merchant portal, you can create all the users you need to manage your business.

Overview
The Users screen is the management area where you add, edit, suspend, reactivate and delete Users.
Users can only be added and edited by Users with Merchant Admin roles.
Open User Settings
- Select the Settings option from the top Main menu bar. The Settings menu bar displays.
The Users page opens by default. - Go to the procedure you want below.
User Status
The status controls which actions can be performed on that User Account. The User statuses are:
Pending
The User has not yet verified their email address and set up a password for their User account. They have no access to the system.
The pending User account can be deleted, or their activation email re-sent by the Merchant Admin. The User’s name, role and organisation access can be edited. No other actions are possible.
Active
The User is active on the system and has access to the options their role has permission for.
The active User’s name, role and organisation access can be edited by the Merchant Admin. They can also suspend, activate or delete the User.
Deleted
The User has been deleted from the system. No record of the User is kept, and no further actions can be taken on the User account.
Suspended
The User has been suspended and they have no access to the system.
The suspended User’s name, role and organisation access can be edited by the Merchant Admin. They can also delete or activate the User.
Locked
The User’s account has been locked and they have no access to the system. This is a result of five failed attempts to log in to the portal.
The suspended User’s name, role and organisation access can be edited by the Merchant Admin. They can also delete, suspend or unlock the User.
Add New User
New Users can be added to the system from the Users page. The role they’re assigned to sets what rights they have in the system and what they can view. The organisation they are assigned to sets which organisation data they are able to view.
Email has to be uniqueEach User must have a unique email address. Duplicate Users with the same email address are not permitted by the system.
Go to settings page and click on "Add new user"

1.Click the New button on the Users page. The Add new User page will display.
- Type in the First Name, Last Name and Email for the new User in the appropriate fields. Ensure the email address is unique.
3. Click on the Choose role link in the Role section. A Choose role slide-out box reveals, showing the available roles.
4. Select the radio button for the role you want, either Merchant Admin or Merchant Risk Manager or Sales Agent

Note: To view the details of the available roles, click on the ![]() Open blue arrow. A Role details slide-out box reveals, showing the rights granted for the selected role. To retract the Role details box, click on the
Open blue arrow. A Role details slide-out box reveals, showing the rights granted for the selected role. To retract the Role details box, click on the  Close button.
- Click on the Update button. The Choose role box retracts and the selected role displays in the Role section.
- Click on the Select organisations link in the Organisation hierarchy access section. A Select organisations slide-out box reveals, showing the available organisations.
- Check the box for the node in the organisation hierarchy you want the new User to be assigned to.
If an organisation has sub-organisations (i.e. children organisational units and/or outlets), a ![]() white arrow icon displays beside their name. Click on the
white arrow icon displays beside their name. Click on the ![]() white arrow icon to display the sub-organisations.
white arrow icon to display the sub-organisations.
Assign users to Organisational units and Merchant level onlyOrganisational Units can only be assigned users. Outlets does not have assigned users.
Tip: For more details on nodes and an explanation of hierarchy and company structure organisation in the system, see the Organisation Hierarchy topic.
-
Click on the Update button. The Select organisations box retracts and a "1 organisations selected" notice displays in the Organisation hierarchy access section.
-
Click the Add User button. The Users page displays with the new User showing in the Users list.
A "User invited successfully" confirmation message displays under the Settings menu.
NoteThe system sends the new User an invitation email, with a Verify Email Address link.
Resend Activation Email
If the new User doesn't respond or loses the activation email, it can be sent again.
- Click on the name of the User you want from the Users list. The User Details page displays.
Because the new User hasn't verified their email address yet, there will be a Resend activation email button displayed. - Click on the Resend activation email button. The system sends the new User another invitation email, with a Verify Email Address link.
Edit User
User’s' names, roles and organisations can be edited from the Users screen.
Note: A  Lock icon displays beside the name of Users that cannot be edited.
You cannot edit a User who has higher access to the system than you.
If the User holds an equal role to you, but was assigned that role by a higher access User, then you also will not be able to edit them.
- Click on the name of the User you want from the Users list. The User Details page displays.
- Do you want to edit the User's name?
If yes, click on the Edit icon beside the Name fields. An Edit User name slide-out box reveals. Go to step 4.
If no, go to step 5. - Type over the new first or last name in the appropriate field, and click the Update button. The Edit user name box retracts and the edited name displays in the Name field.
- Do you want to edit the User's role?
If yes, click on the Edit icon beside the Role field. A Choose user's role slide-out box reveals. Go to step 6.
If no, go to step 7. - Select the radio button of the new role you want, and click the Update button. The Choose user's role box retracts and the new role displays in the Role field.
- Do you want to edit the User's organisation access?
If yes, click on the Edit icon beside the Organisation access field. A Select organisations slide-out box reveals. Go to step 8.
If no, go to step 9.
NoteYou can only view the User’s assigned organisations that your role has access to.
- Check the box for the new organisation you want, and click the Update button. The Select organisations box retracts and the new organisation displays in the Organisation access field.
If an organisation has sub-organisations, a white arrow displays beside their name. Click on the white arrow to display the sub-organisations.
NoteOnly one organisation can be selected. Outlets cannot be selected.
- Click on the View Users link below the Settings menu when you have finished. The Users screen displays, with the edited User information in the Users list.
Suspend / Activate User
Users can be suspended temporarily. During this time the User will have no access to the system. Their account will be suspended until it is manually activated.
Suspend User
- Click on the name of the User you want from the Users list. The User Details page displays.
- Click on the Suspend User button. A Suspend User confirmation box displays, asking you to confirm you want to suspend the account of the User.
- Click the OK button. The User's account is suspended, and they will have no access to the system.
A "User's account has been suspended" confirmation message displays under the Settings menu bar. - Click on the View Users link to return to the Users page.
Activate User
This procedure is also used when a User locks their account (deactivates the User) by inputting the wrong password 5 times. The Merchant Admin User or Network International Admin User must then unlock the account by activating the User.
- Click on the name of the User you want from the Users list. The User Details page displays.
- Click on the Activate User button. An Activate User query box displays, asking you to confirm you want to activate the account of the suspended User.
- Click the OK button. The box closes. The User's account is activated, and they now have access to the system.
A "User's account has been activated" confirmation message displays under the Settings menu bar.
Delete User
Users can be deleted from the system from the Users page in two ways.
Quick Delete
- Login to the Portal.
See the Login topic for details. - Select the Settings option from the top Main menu bar. The Settings menu bar displays.
The Users page opens by default. - Click on the
 Delete icon beside the name of the User you want to delete from the system.
A Remove User confirmation box displays, asking you to confirm you want to delete the User. - Click the OK button. The User is removed from the system.
A "User has been deleted" confirmation message displays under the Settings menu.
Delete from User Details page
- Login to the Portal.
See the Login topic for details. - Select the Settings option from the top Main menu bar. The Settings menu bar displays.
The Users page opens by default. - Click on the name of the User you want to delete from the Users list. The User Details page displays.
- Click on the Delete User button. A Remove User confirmation box displays, asking you to confirm you want to delete the User.
- Click the OK button. The User is removed from the system and the Users page displays.
A "User has been deleted" confirmation message displays under the Settings menu bar.
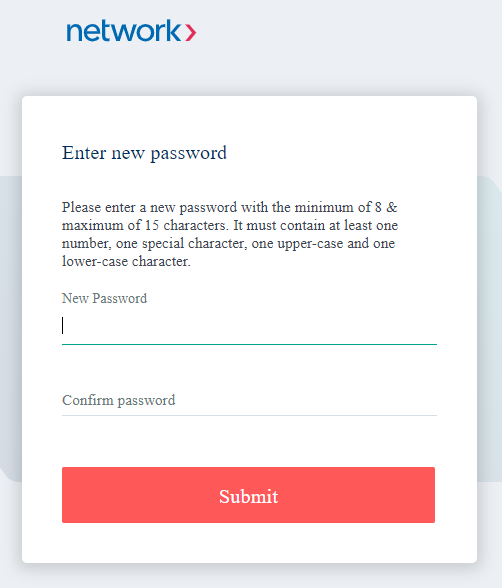
Reset Password
- Visit the login page. Click the "Forgot Password" link.
- Enter your email into the box and click "Submit"
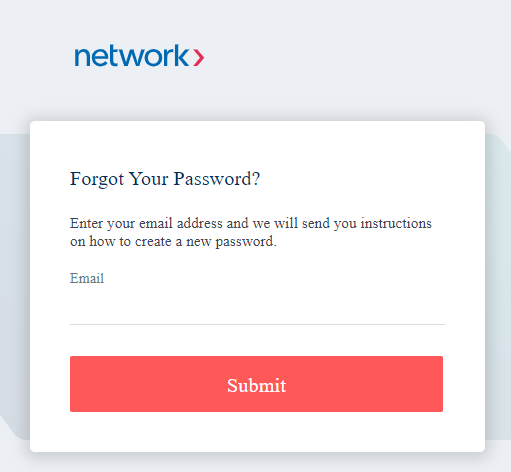
- You will receive an email with a link to re-set your password.
- Click on the link and reset your password.
User Roles
Merchant Admin: This existing role has the permission for all functions on the portal
Merchant Risk Manager: This existing role is for the Risk department to manage their risk rules.
Sales Agent: This existing role is more for a view only purpose and to send and create Payment links.
Sales Manager: This role can send and create payment links as well as edit configuration, setup of payment links and cancel transactions
Sales Supervisor This role has the same permissions as Sales Manager but with the ability to refund transactions
Finance Manager: This role has the permissions as Sales Supervisor but with the option to create new users and manage paypage branding
Web Developer: Has the permission to configure settings and setup service accounts, but does not have the ability to process refunds/cancel transactions, partial captures or create new users.
It Manager: Has the same permissions as Web developer but including the ability to create new users.
| Privileges | Sales Agent | Sales Representative | Sales Supervisor | L1 Supervisor | Sales Manager | Finance Manager | Web Developer | IT Manager | Merchant Risk Manager |
|---|---|---|---|---|---|---|---|---|---|
| Summary | Y | Y | Y | Y | Y | Y | Y | Y | N |
| Orders (View only) | Y | Y | Y | Y | Y | Y | Y | Y | N |
| Orders (Download) | N | N | Y | N | Y | Y | Y | Y | N |
| Reports (View only) | Y | Y | Y | Y | Y | Y | Y | Y | N |
| Reports (Download) | Y | Y | Y | N | Y | Y | Y | Y | N |
| Payments (Pay-by-link & QR Code) | Y | Y | Y | Y | Y | Y | N | N | N |
| Virtual Terminal - Only if it is enabled | Y | Y | Y | Y | Y | Y | N | N | N |
| FRM (View Only) | Y | Y | Y | Y | Y | Y | N | N | N |
| Full Auth Reversal | N | N | Y | Y | Y | Y | N | N | N |
| Capture (Full and Partial Capture) | N | N | Y | Y | Y | Y | N | N | N |
| Void (cancel capture and full auth reversal) | N | N | N | N | Y | Y | N | N | N |
| Refund (full and partial) | N | N | N | N | N | Y | N | N | N |
| Optional manager approval for refund transactions | N | N | N | N | N | Y | N | N | N |
| FRM Override | N | N | N | N | N | Y | N | N | N |
| Settings (Risk Rules) | N | N | N | N | N | N | N | N | Y |
| Org Hierarchy (View only) | Y | Y | Y | Y | Y | Y | Y | Y | Y |
| Org Hierarchy - Fields(ChainID, MIDs, TIDs, payment channels) - (View & Edit) | N | N | N | N | N | N | N | N | N |
| Settings (PBL configuration & template) | N | N | N | N | Y | N | N | N | N |
| Settings (Payment configuration - PBL + Others) | N | N | N | N | N | Y | N | N | N |
| Settings (Integration) | N | N | N | N | N | Y | Y | Y | N |
| Settings (General) | N | N | N | N | N | Y | Y | Y | N |
| Settings (View Only) | Y | Y | Y | Y | Y | Y | Y | Y | Y |
| Settings (Create, Update, Delete) | N | N | N | N | N | N | N | N | N |
Updated 5 months ago