My Network App User Guide
This guide helps you get started quickly and make the most of the Network POS App, whether you’re a cashier or a business owner.
Through this step-by-step guide, you’ll learn how to:
- Set up your account and log in for the first time
- Invite new users (for business owners)
- Accept payments via Tap to Pay, Pay by Link, and Invoice Creation
- Track transactions, manage refunds, and share digital receipts
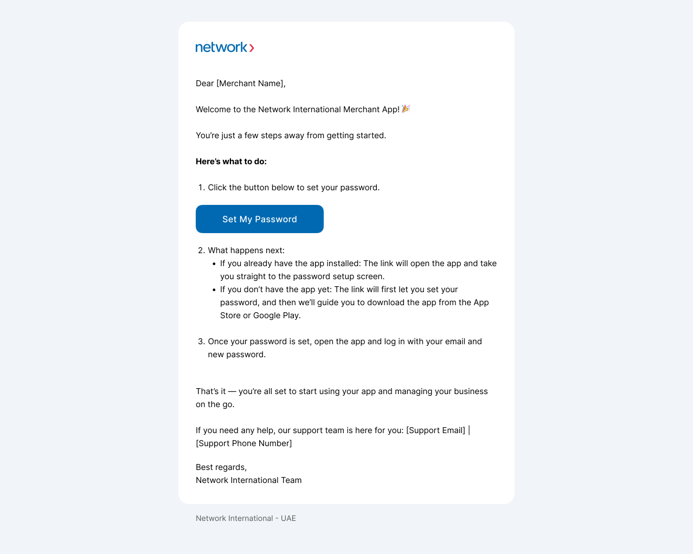
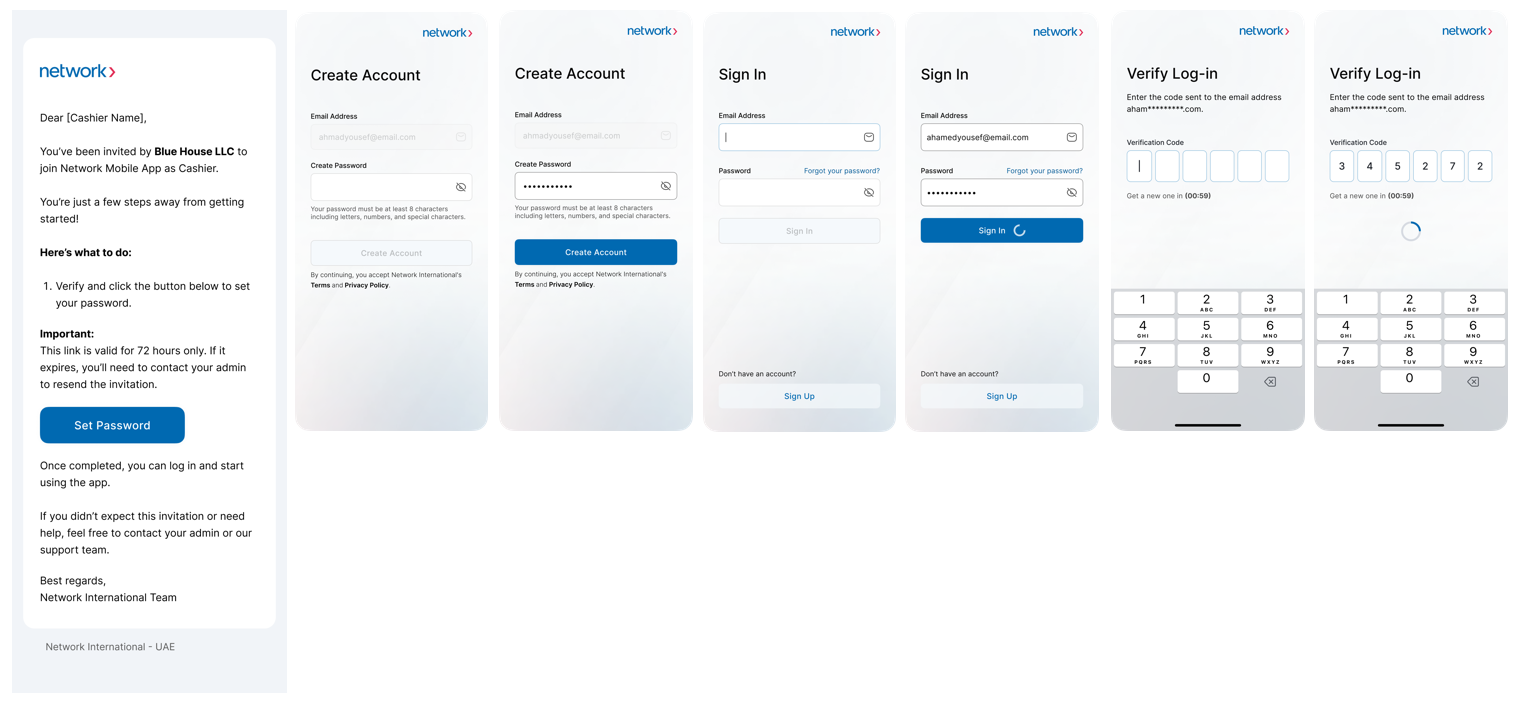
Welcome Email
Once onboarding is complete, you’ll receive a welcome email from Network International.
This email includes a link to activate your account and set your password.
- Tap Set My Password in the email.
- If you already have the app installed, the link opens it directly.
- If not, you’ll be guided to set your password and download the app from the App Store or Google Play.
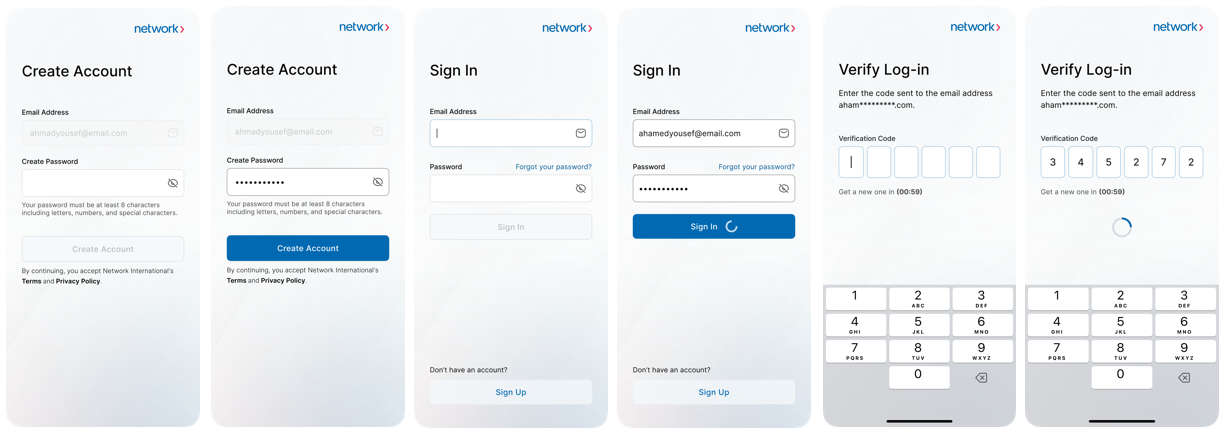
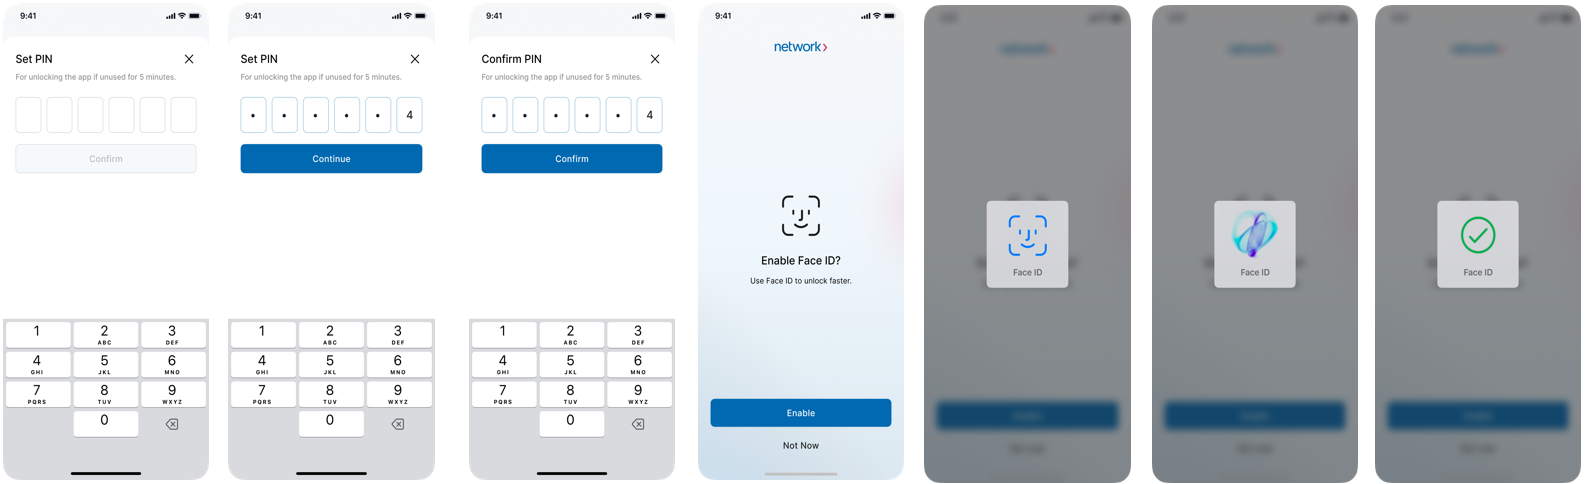
Create Account & Sign In
- Tap the link in the email to open the Create Account screen.
- Enter your password and tap Create Account.
- Log in using your registered email and password.
- Enter the 6-digit verification code sent to your email.
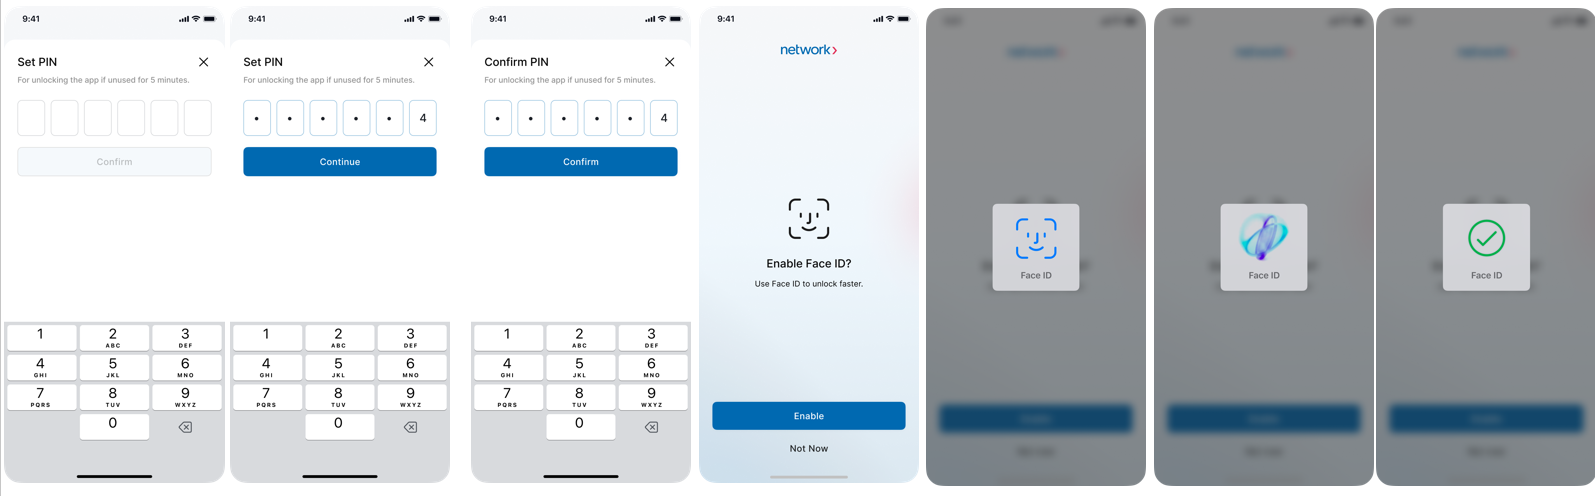
- Create a 6-digit PIN for quick, secure access.
- Optionally, enable Face ID for faster authentication.
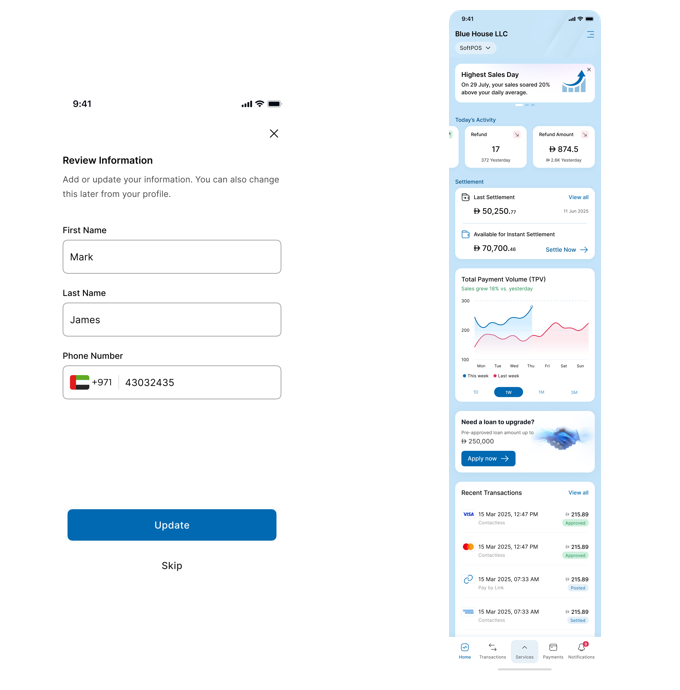
- Review and update your profile before proceeding to the home screen.
After signing up, you’ll be prompted to review and confirm your profile information.
- Enter your name and phone number
- Tap Update to save, or Skip if details are already correct
Once complete, you’ll be redirected to your Home screen where you can view:
Sales summary
Recent transactions
Quick access to features (Tap to Pay, Pay by Link, Invoice)
Review Account Information Screen.
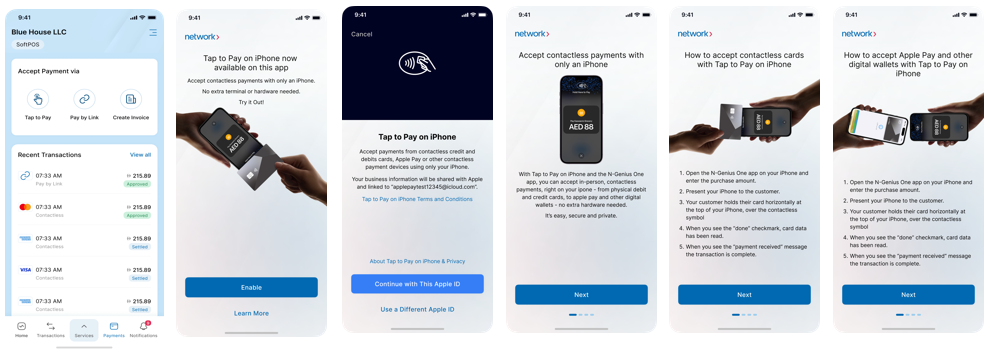
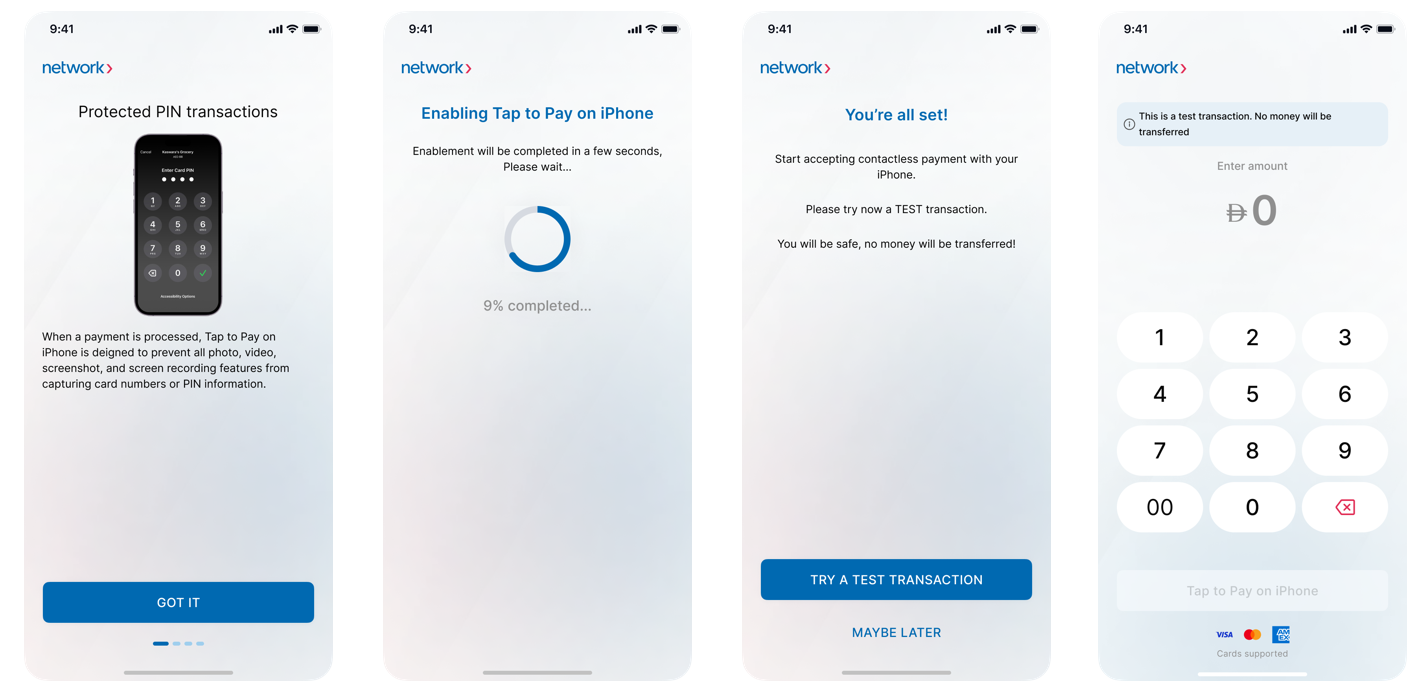
Tap to Pay on iPhone Enablement
- Tap Enable to start setup.
- Link your Apple ID by tapping Continue with This Apple ID.
- Follow the tutorial screens (tap Next to proceed).
- Tap Got It on the final screen.
- Wait for activation to reach 100%.
- Once complete, you’ll see “You’re all set!”
- You can run a Test Transaction to simulate a payment.
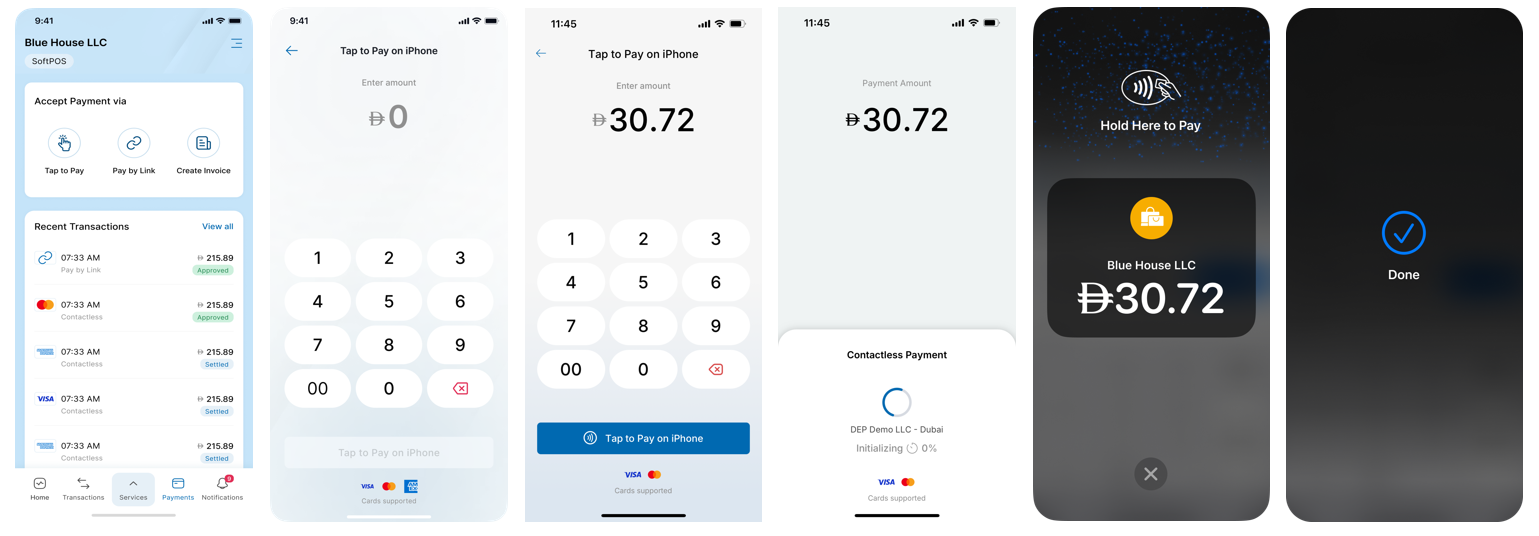
Accepting Payments (Tap to Pay)
- Tap Tap to Pay on the app’s home screen.
- Enter the amount and tap Tap to Pay on iPhone.
- Ask the customer to tap their card.
- Once processed, the Done screen confirms the transaction.
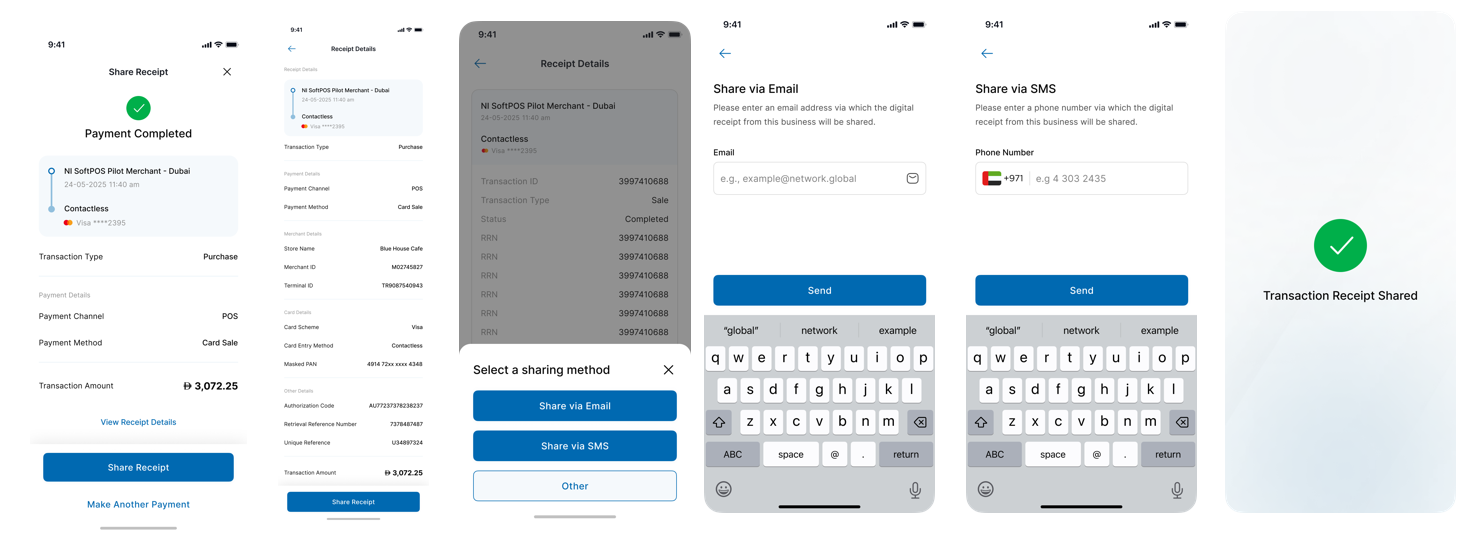
Share Receipt
After a successful transaction, the Payment Completed screen appears.
You can review and share the receipt:
- Email: Enter customer’s email → Send
- SMS: Enter customer’s number → Send
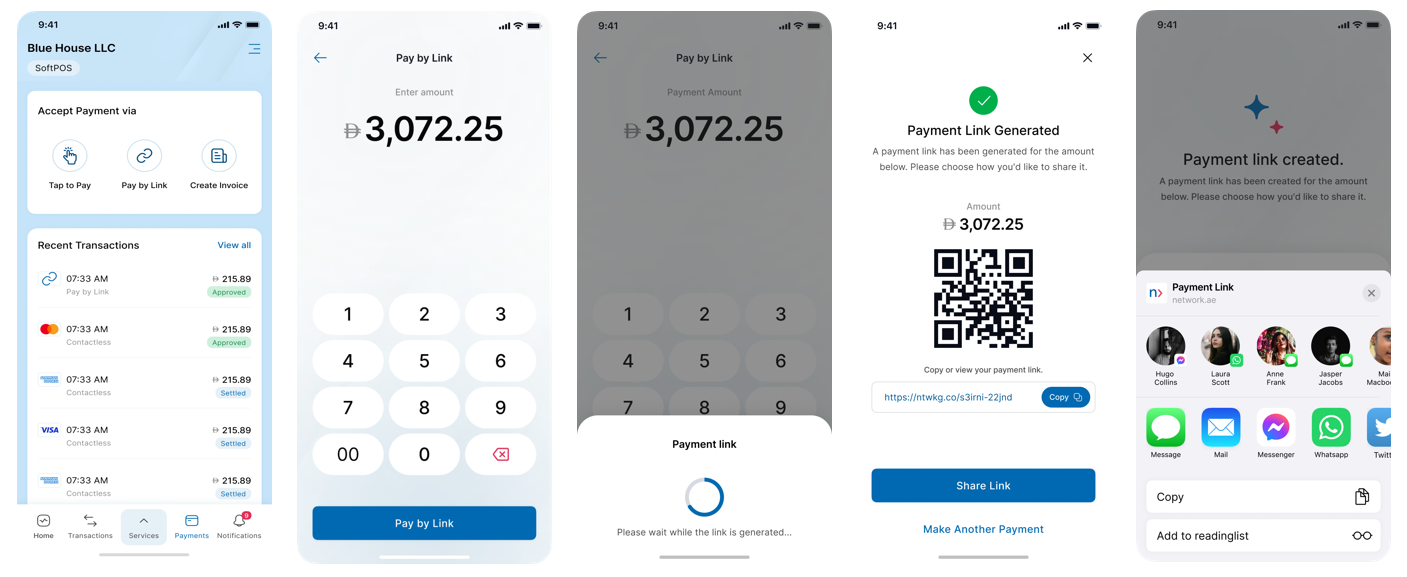
Pay by Link
- Tap Pay by Link.
- Enter the amount → tap Generate Link.
- A QR code and link are generated.
- Share via email, SMS, or any available app.
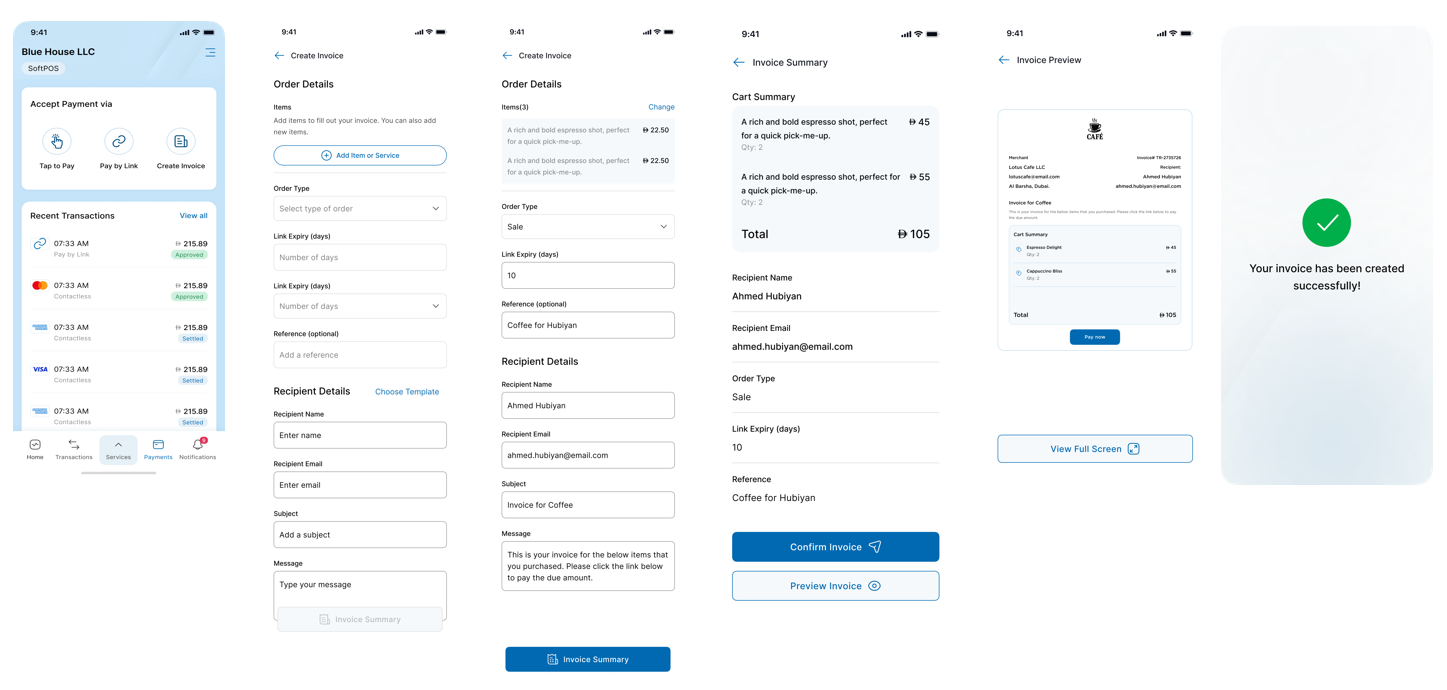
Create Invoice
- Tap Create Invoice.
- Fill required fields → tap Invoice Summary.
- Review details → tap Confirm Invoice or Preview Invoice.
- Once sent, a confirmation message appears.
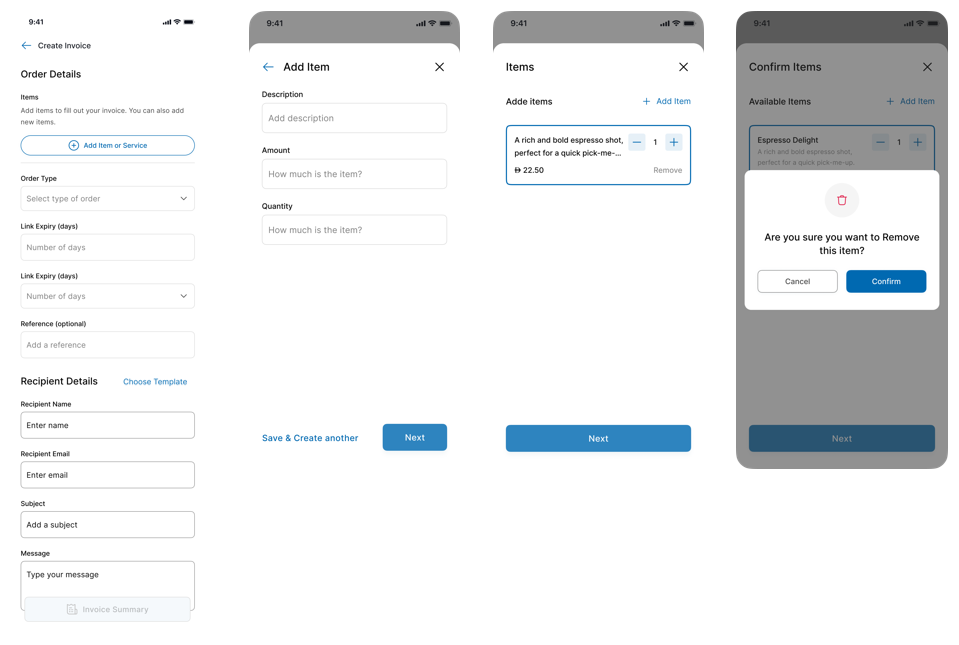
Add Item or Service
- Tap Add Item or Service.
- Enter details: description, amount, quantity.
- Tap Save & Create Another or Next.
- Manage items: add, remove, or confirm.
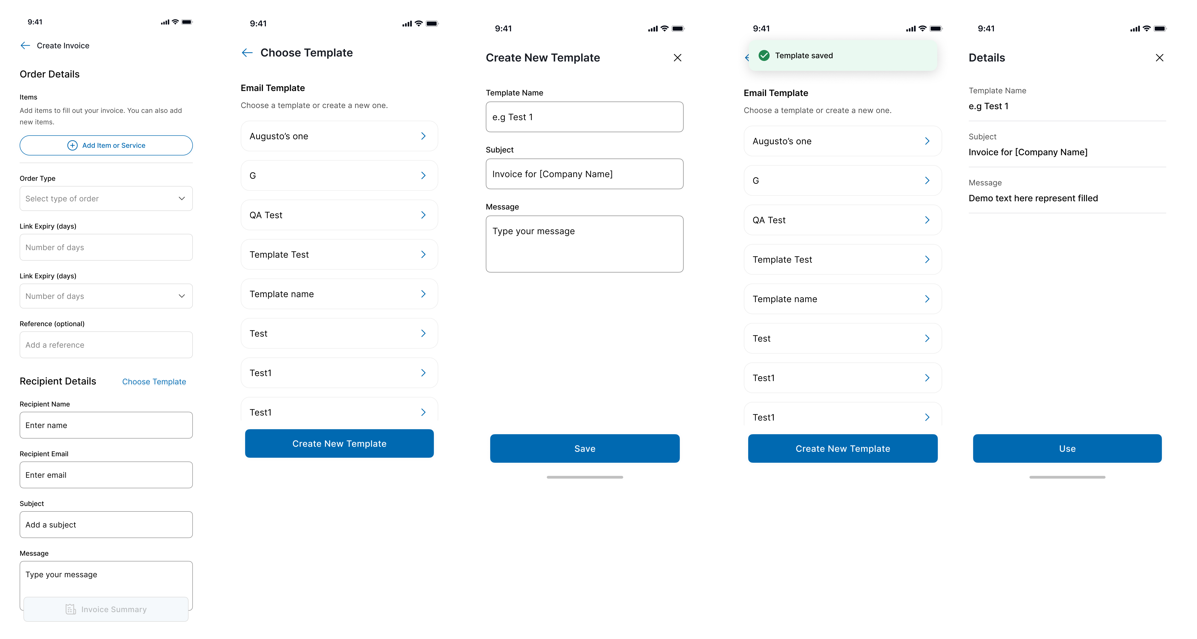
Choose & Create New Template
- Tap Choose Template during invoice creation.
- Select a saved template or Create New Template.
- Enter name, subject, and message → tap Save.
- Tap Use to apply a saved template.
Check out Pay-by-Link Email Templates.
Transactions (In-App)
From Transactions → In App, view all recent payments.
Use filters for Date Range, Terminal, or User.
Tap any transaction for details.
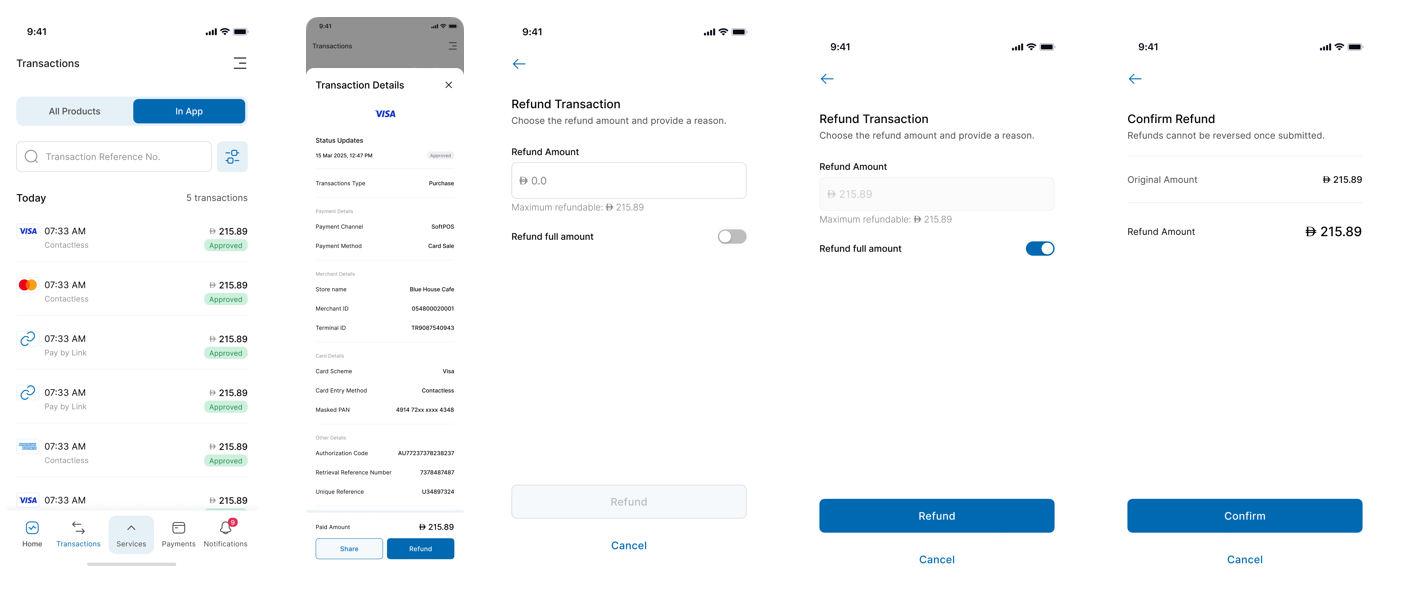
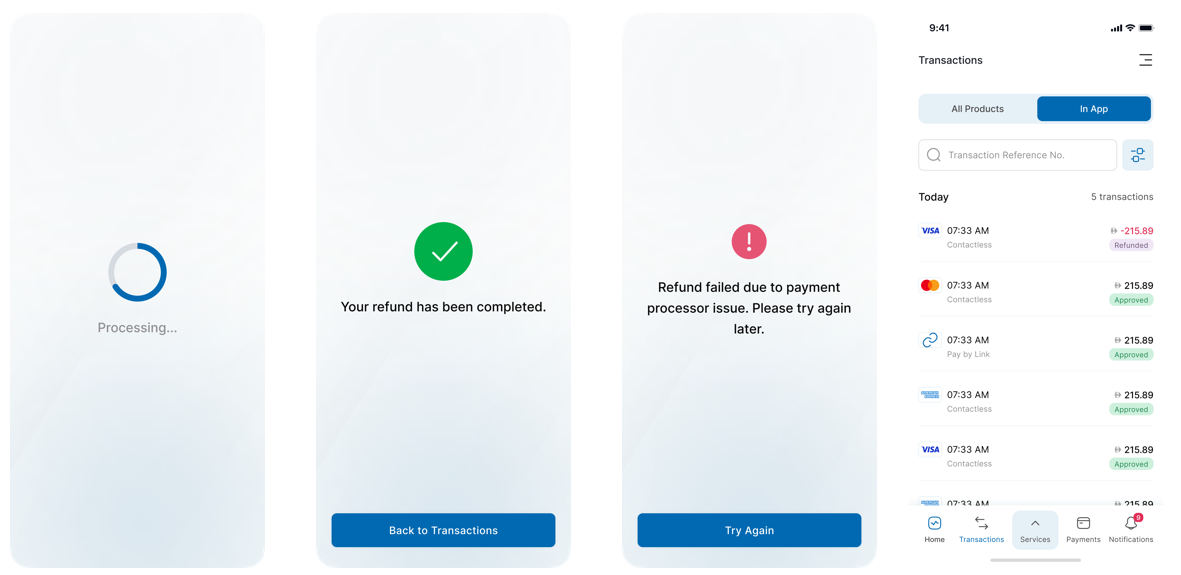
Refunds
- Open the transaction → tap Refund.
- Enter the amount or toggle Full Refund.
- Confirm the refund.
- Success: “Your refund has been completed.”
Failure: “Refund failed. Please try again later.” - Refunded transactions show as Refunded.
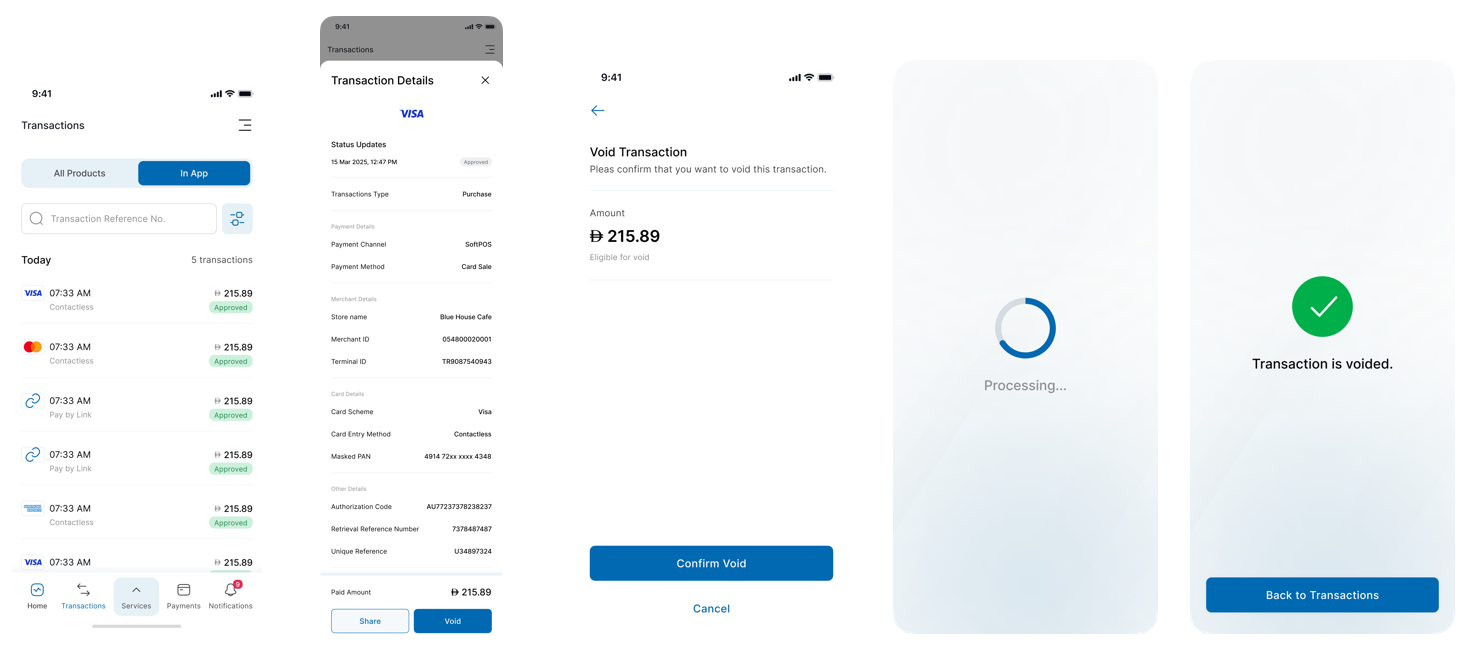
Voids
- Open the transaction → tap Void.
- Confirm to cancel the payment.
- Once complete, “Transaction is voided” message appears.
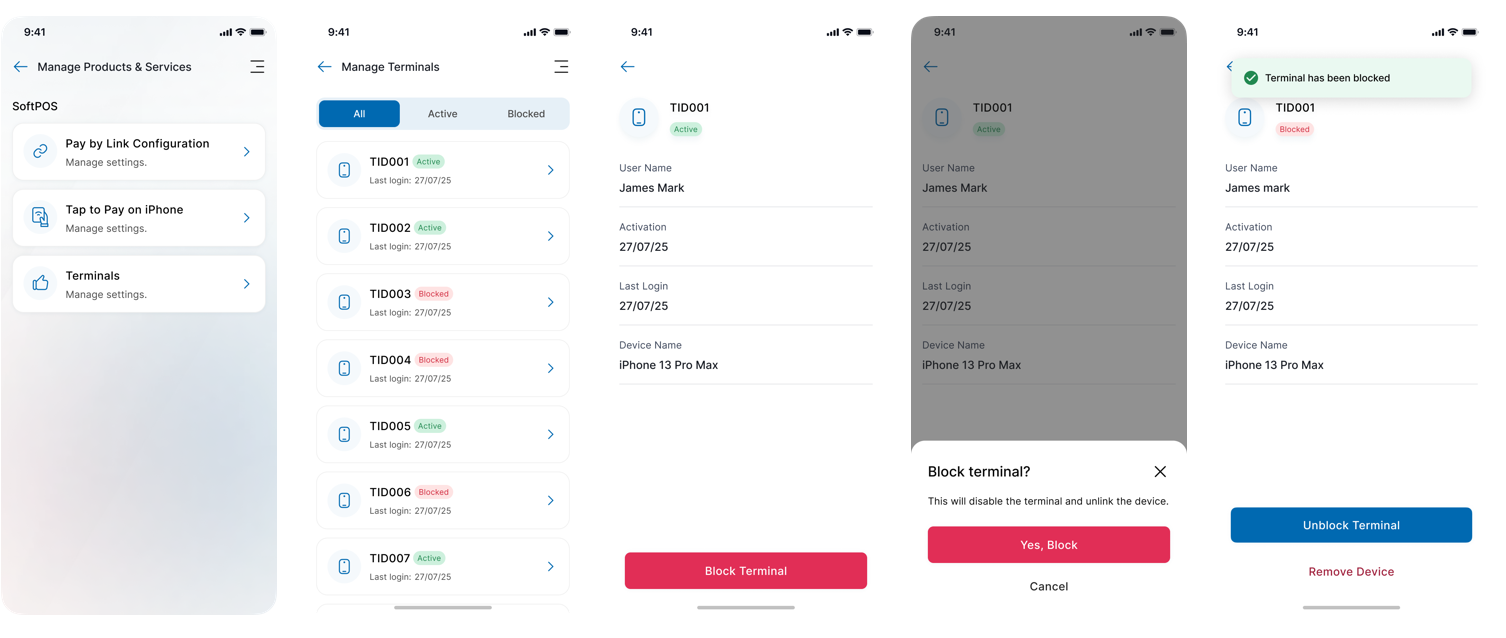
Manage Products & Services – Terminals
- Navigate to Manage Products & Services → Terminals.
- View terminal list with Active or Blocked status.
- Tap a terminal ID for details.
- Tap Block Terminal or Remove Device as needed.
- To reactivate, tap Unblock Terminal → confirm.
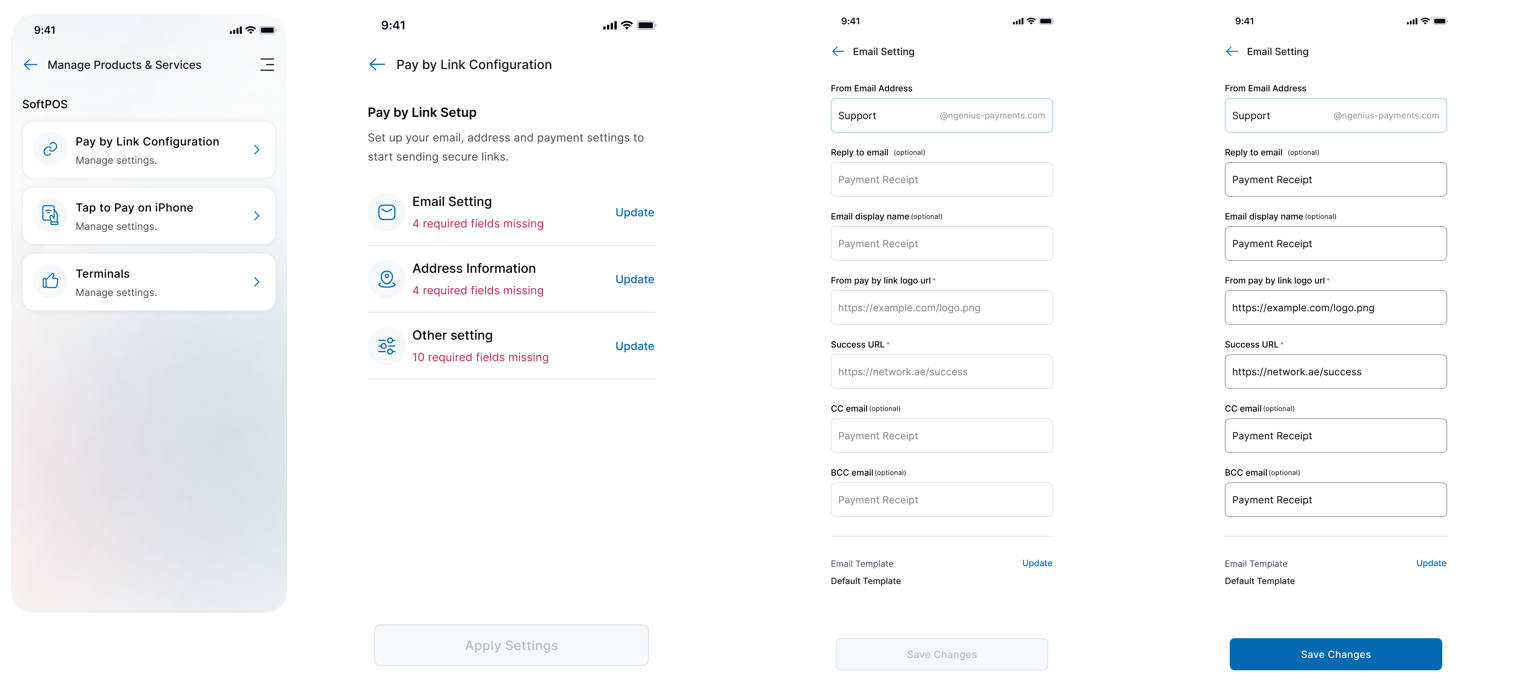
Pay by Link Configuration
-
Go to Manage Products & Services → Pay by Link Configuration.
-
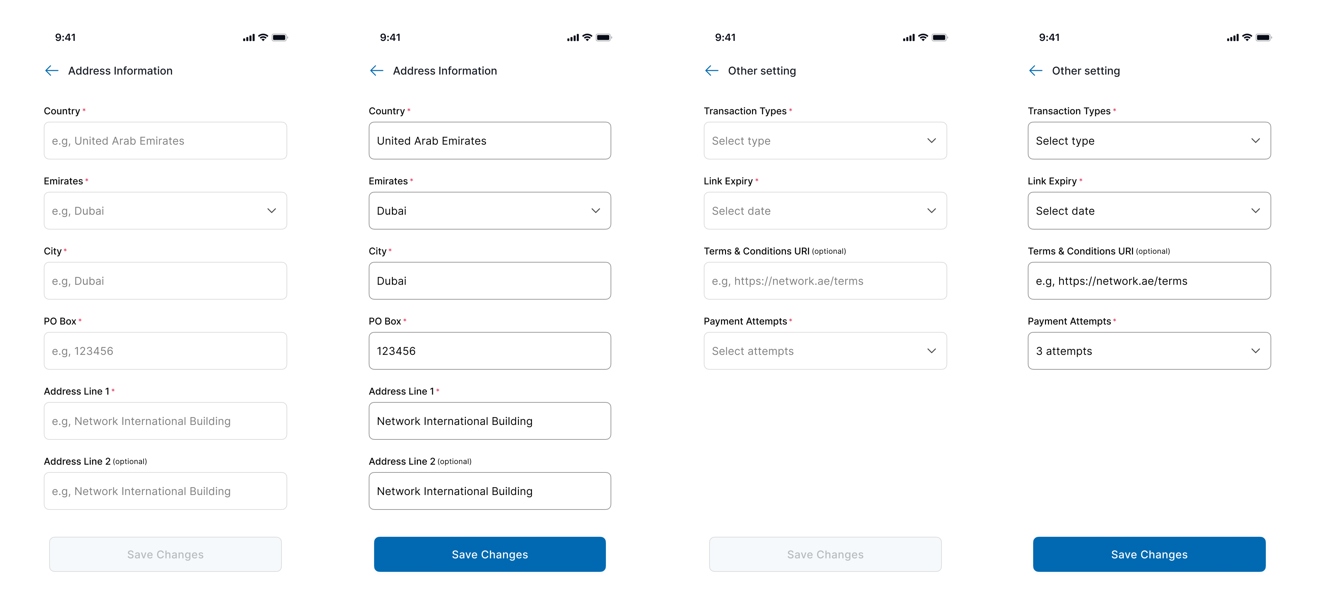
Update details in each section:
- Email Settings
- Address Information
- Other Settings
-
Tap Apply Settings to confirm.
-
A confirmation message appears: “Settings applied successfully.”

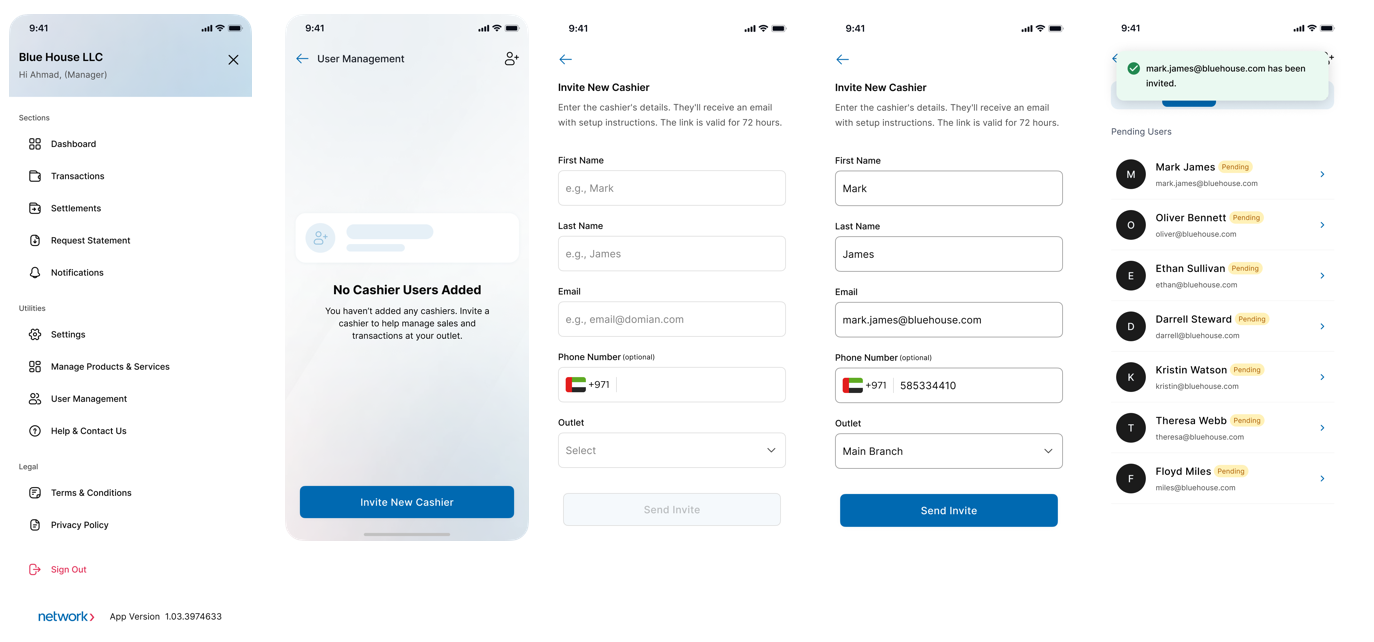
User Management
Invite a New Cashier
- Go to User Management.
- Tap Invite New Cashier → fill details → Send Invite.
- Cashier appears under Pending Users.
Cashier Enablement
- Cashier receives an email → tap Set Password.
- Complete account setup, PIN, and Face ID.
- Review profile details and tap Update or Skip.
- Access granted to the Home Dashboard.
Dashboard
The Dashboard provides a summary of your business activity and quick access to key features. This section explains each Dashboard component and how to use them.
Product Selector
The Product Selector allows you to view Dashboard data for a specific product or for all of them.
Latest Settlement
The Latest Settlement section displays information about your most recent settlement.
You will see:
- The settlement date.
- The total amount settled.
- A link to view all settlements.
Today’s Activity
Today’s Activity gives you an overview of your business performance for the current day.
You will see:
- Total Volume: The total value of all payments processed today.
- Payments: The number of successful payment transactions.
- Refunds: The number of refund transactions.
- Refund Amount: The total value of refunds processed.
Total Payment Value
The Total Payment Value section displays a graph of your payment volume over time.
You can choose the period to display: 1 day, 1 week, 1 month, or 3 months, and then compare it with the previous period.
The chart reflects the volume of non-voided sales without refunds.
Recent Transactions
Recent Transactions shows your latest payment and refund activity.
Settlements
The Settlements section allows you to view details of your business settlements.
- Filtering Settlements
Use filters to narrow down the list of settlements- Tap the Filter icon to select your criteria (such as date range or settlement status).
- Apply multiple filters together for more precise results.
- Amount
The amount reflects the total funds transferred to your account after processing transactions. - Settlement Transactions
Tap on a settlement to view the list of transactions included in that settlement.
You will see transaction details such as date, amount, and payment method for each transaction that was part of the settlement.
Request Statement
The Request Statement feature allows you to request a detailed statement of your account activity directly from the app.
How to request a statement:
- Select the Merchant ID from the list.
- Choose the start and end dates for the period you want your statement to cover.
- Submit your request.
- A link will be sent to your email containing all statements in that date range.
Note:
You can only request statements for periods where transaction data is available.
If you do not receive the statement, check your spam folder or verify your email address
Notifications
The Notifications section keeps you informed about important updates, payouts, and actions related to your business. You can access all your notifications in one place.
- Mark as Read: Tap on an unread notification to mark it as read. The green dot will disappear, and the background will turn white.
- Mark All as Read: Tap the "Mark all as read" link at the top right of the "Today" section to mark all notifications as read at once.
- The unread badge on the Notifications icon will be updated accordingly.
Explore Products and Services
- Browse available products in the app.
- Tap a product to view its description and express your interest.
- To request a callback, tap “Call me back” and enter your phone number.
- Your request will be sent to the sales team, who will contact you using your provided details.
Settings
Personal information
View your registered personal details. This section is read-only.
Business Information
View your registered business details, including Merchant ID, legal and DBA names, business address, email, and contact number.
All information is read-only.
Bank Details
View your IBAN details.
Password & Authentication
- Password
Here you can change your password for accessing the app.
How to do it:
- On the "Password & Authentication" screen, select Password.
- Enter your current password.
- Enter your new password and confirm it.
- Tap Save.
- A confirmation message will appear once your password has been successfully updated.
- PIN
Here you can change your PIN for quicker access to the app.
How to do it:
- On the "Password & Authentication" screen, select PIN.
- If you already have a PIN, enter your current PIN.
- Enter your new PIN and confirm it.
- Tap Save.
- You will see a confirmation once your PIN has been updated.
- Biometrics
Here you can enable or disable biometric authentication (such as fingerprint or facial recognition).
How to do it:
- On the "Password & Authentication" screen, select Biometrics.
- Toggle the switch to Enable to activate biometric authentication.
- Follow the on-screen instructions to register your biometric data (for example, scan your fingerprint or use facial recognition).
- To disable, toggle the switch to Disable
Help & Contact Us
The Help & Contact Us section provides quick access to support resources and direct contact options for assistance.
Tap the Contact Us button at the bottom to see all the information you need to get in touch with Network International support.
Legal Links
Access important legal information at any time:
- Terms & Conditions
Review the terms for using the app. - Privacy Notice
View details on how your data is handled.
Sign Out
Tap the Sign Out link to log out of the app. A confirmation message will appear — confirm to log out and return to the welcome screen.
Services
Request Statement
See Request Statement section.
Paper Roll Request
Eligible merchants can request paper rolls from the Services section.
How to:
- Select your Merchant ID
- Review and confirm your contact and delivery details,
- Submit the request.
You will receive a confirmation with a ticket number and delivery updates by SMS.
Support & Assistance
If you need help at any point:
📞 Call: 800 4448 (24/7 Merchant Support)
✉️ Email: [email protected]
🌐 Website: www.network.ae
Updated 5 months ago